


The Diary of a Turb Re-Build


Thread Starter
Join Date: Jan 2002
Location: Earth
Posts: 1,189
Likes: 0
Received 0 Likes
on
0 Posts
The Diary of a Turb Re-Build
For the past 12 months or so I have been keeping a re-build log of Druine Turblent G-ARIM. It has been running on another forum, but for various political reasons (moderators scared of a certain overpowering member and tiptoeing around him...), I have decided to continue it here.
The first few posts will be a summary of where it is to date (with dates), and as long as PPRuNe don't mind, I will continue it here, with a hope to be flying by the end of April.
A friend and I decided in 2011 that we needed a project. He's recently retired and a clever man with aircraft building, having built and re-built his own LAA type, and with a very keen eye for detail and accuracy. We decided it would be a 50:50 owned aircraft and I had to quickly think of what I could offer to be of any value to the project bearing in mind what he'd be offering from a technical perspective. So, an area of a farm building was cleared out, and the Turbshop was born. The arrangement is that he provides the skills and all engineering input and I provide the premises and the funding for the project, as well as some of the monkey work. Put even more simply.... He's the brains, and I'm the bank. Despite us both wanting a stunning Turbulent at the end, I won't go as far as to say the project was without an upper budget spend, but if she needed it, she would get it.
We didn't know what we wanted to restore from the outset. I've always had a hankering for a single seat, open cockpit low wing monoplane. We scanned the ad's for a few months and one day G-ARIM appeared. She was started in 1961 by an Adolf Schima and despite then being owned by various parties since then, was never actually officially flown, despite being granted numerous Permits to Test. Her PFA number is 501, so she is certainly an early bird.
Adolf Shima, with G-ARIM in the 1960's. Note the strange engine he was using.
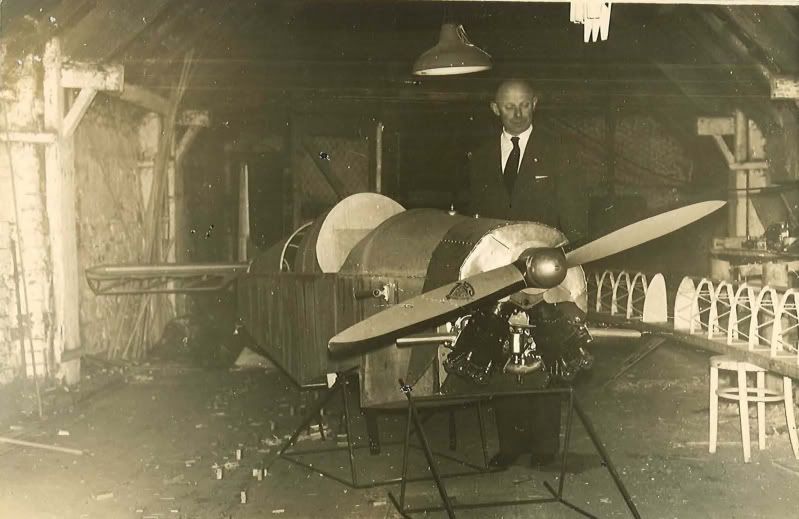
We have been told that Mr Shima died before 'IM was complete and she was then sold to another party, who also died before she was completed. If I start feeling a bit peaky I'll let you know....
We found her in Cambridgeshire, with another of her many owners (who looked refreshingly like he wasn't about to die), and she was still in many bits. Little bits of work had been carried out by each owner, and she had travelled around the country with a surprising amount of hardware to get her completed. A deal was done, and she was duly collected in a glider trailer the following week. Sam decided we shouldn't buy the engine that came with her and that we'd source another one. The provenance of the engine she came with was not known, and it looked like it would be a major overhaul job, which, for the money being asked for it, made it unviable.
Shortly after, an engine was sourced from a lovely man up in Lincolnshire direction who was building a Hurricane replica. It was Autumn 2012 by that point, and Sam wisely decided to focus on getting the engine sound while it was cold and damp, rather than work on the fuselage. I had a call one morning from Sam telling me he had managed to rig up an engine test bed. Imagine my surprise when I walked into the Turbshop to see a cleverly adapted bomb trolley, that was now a mobile engine test bed!!
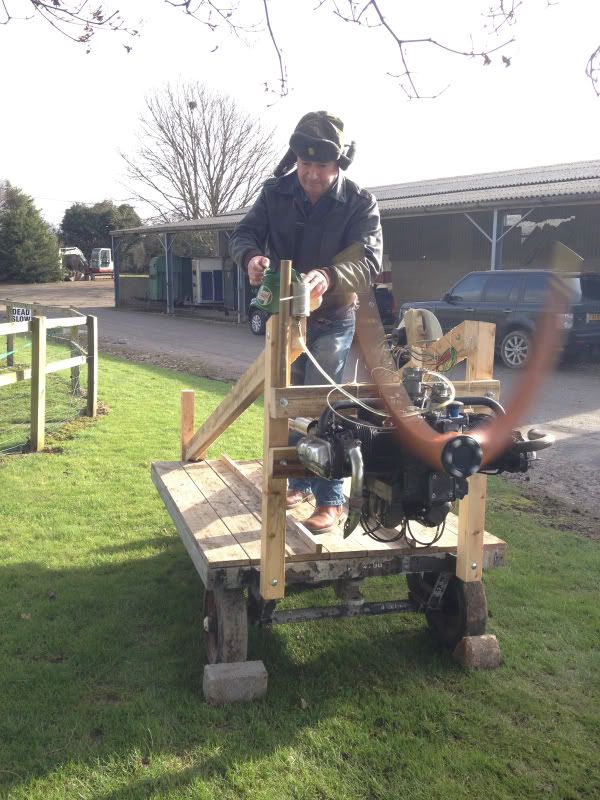
The little VW, being tested by Deppity Dawg. I know it looks a little bit 'Yeehaa' but it was all carefully planned.
A little clip of the third run since major overhaul...
Many happy hours were spent over the Christmas spell freezing my baubles off in the propwash of the little VW, making sure the carb was properly set up, that the heat system worked, that the timing was spot on, and that she did a good few hours of ground running before we inhibited her prior to final installation. A word of advice..... aircraft engine test beds and horse livery yards aren't perfectly designed to mutually co-exist, but Mrs M didn't complain once.
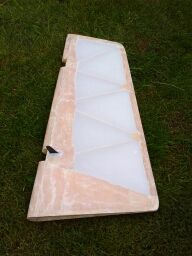
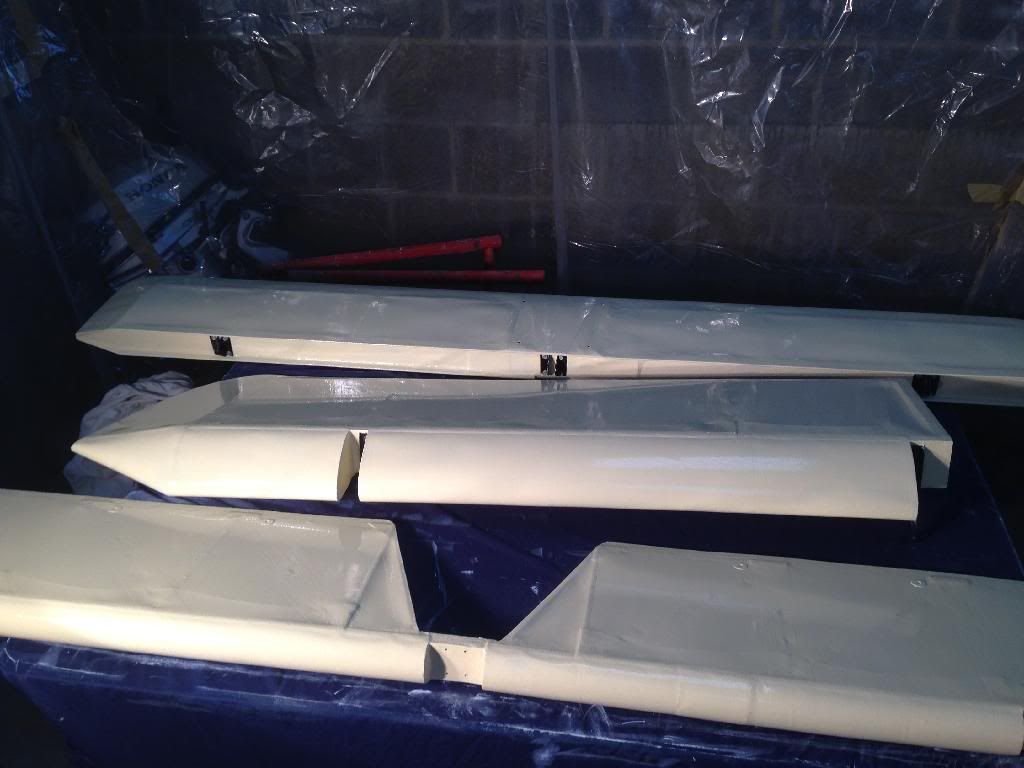
When we bought G-ARIM her fuselage was bare of fabric (but surprisingly intact) and her wings and control surfaces were fabric covered.
The wing, as we found it
The wing, after a stripping session.
We had planned to turn out an immaculate aircraft, and although one option would have been to accept the wing as it was, we decided to be completely thorough and strip the fabric off for a full inspection. Once this was done, the structure was surprisingly clean, constructed to a very high standard, and in good shape, although there was evidence of dampness at some point as some of the bolt heads were corroded. This wasn't a concern, as the plan had always been to replace them all anyway. The LAA inspector visited, and said what the man from Del Monte frequently says. We could keep progressing...
Many internal hardware items had rusted, despite their external ends being sound. A bit of an eye opener as to what could be lurking inside older aircraft...
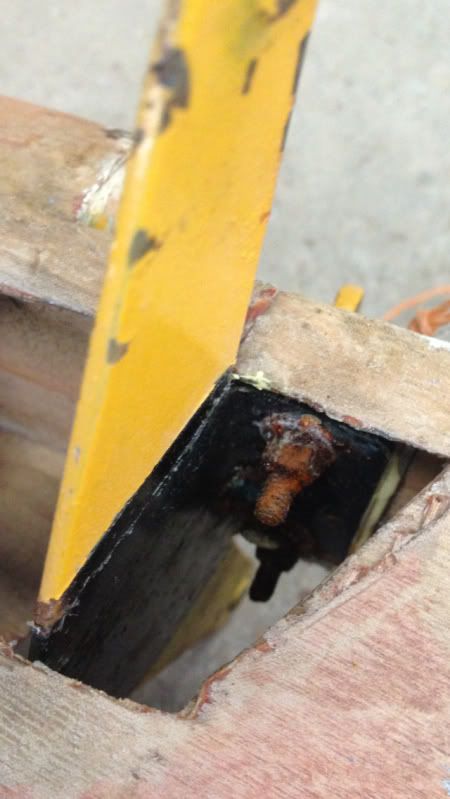
Each and every bracket was removed, stripped and re-painted (that was one of the jobs I was trusted to do). Pulleys were replaced with new were necessary, all other hardware replaced with new regardless, any tiny wood joint weaknesses were strengthened, and new ply skin added where required. A slick little production line of metal parts worked their way through the home-made paint shop department of the Turbshop and then back into the assembly line for installation.
Paint shop
Sam's careful work
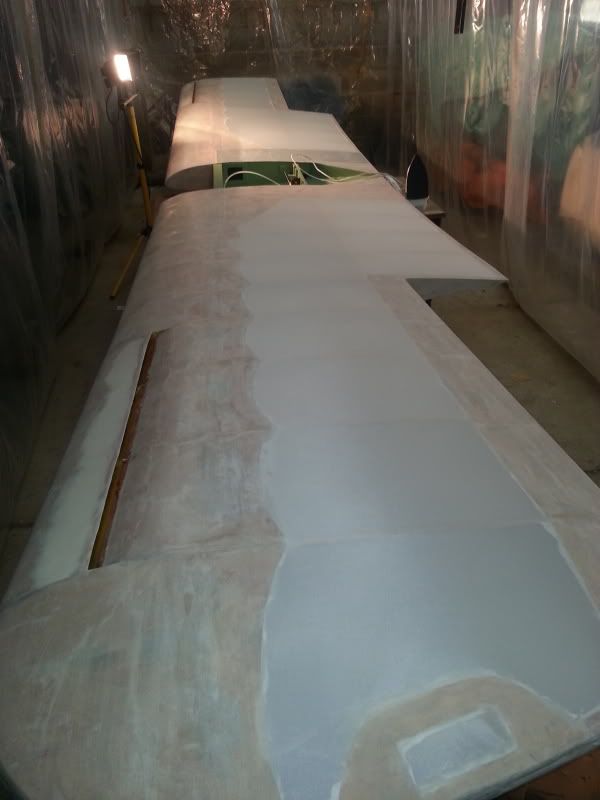
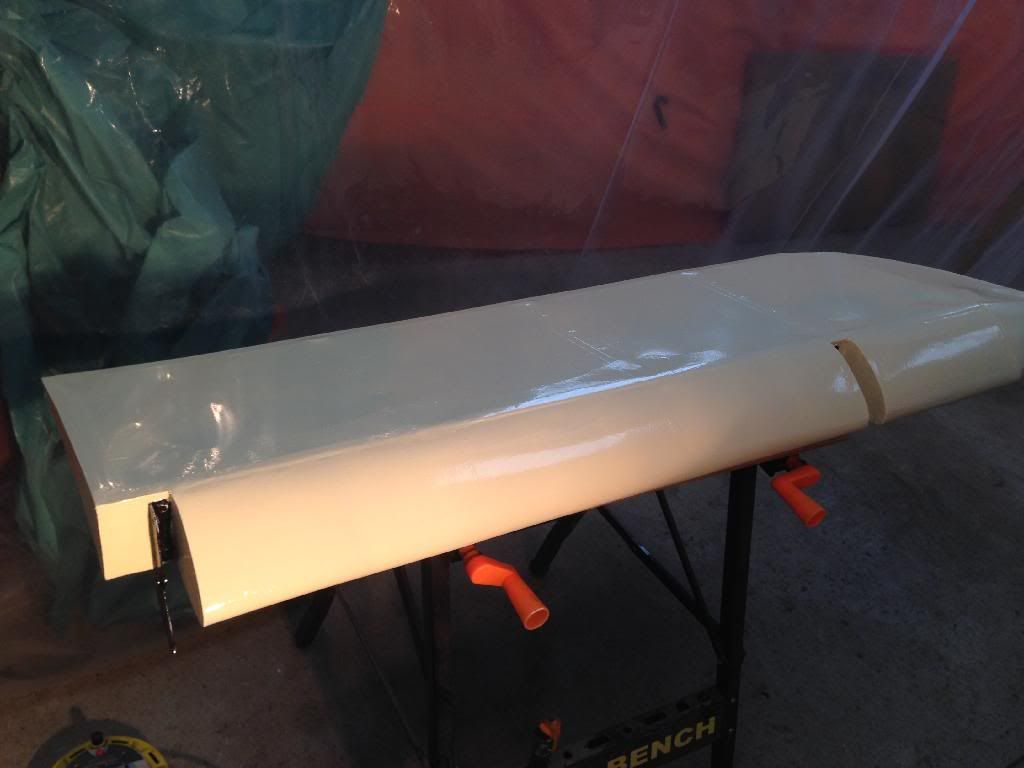
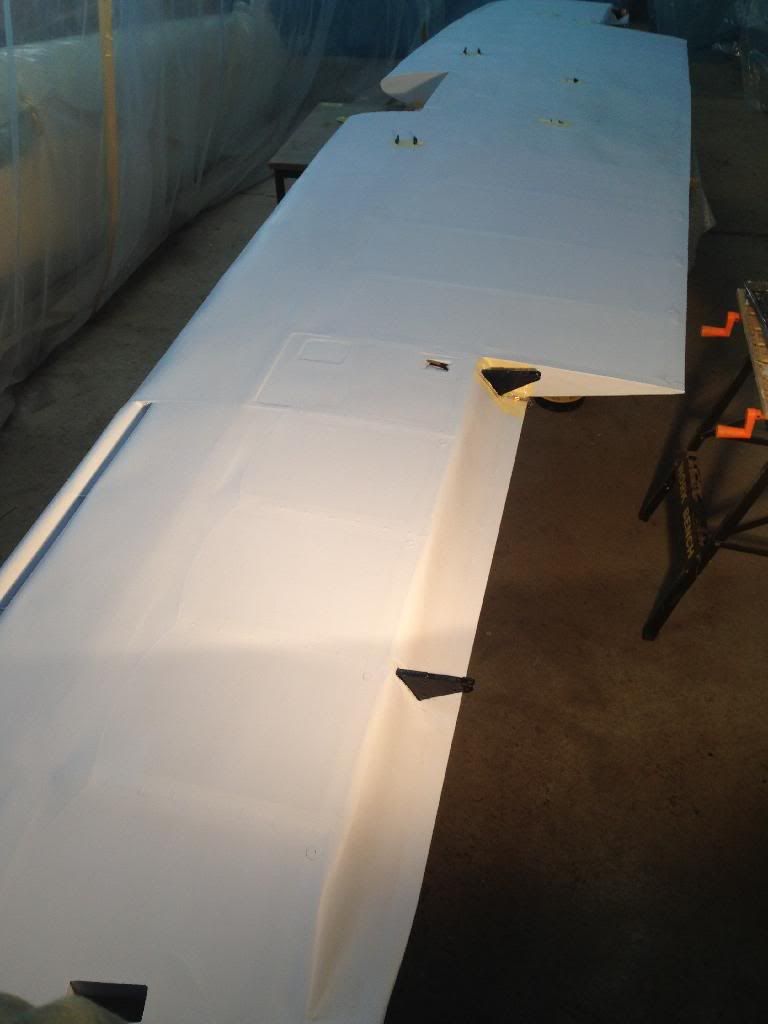
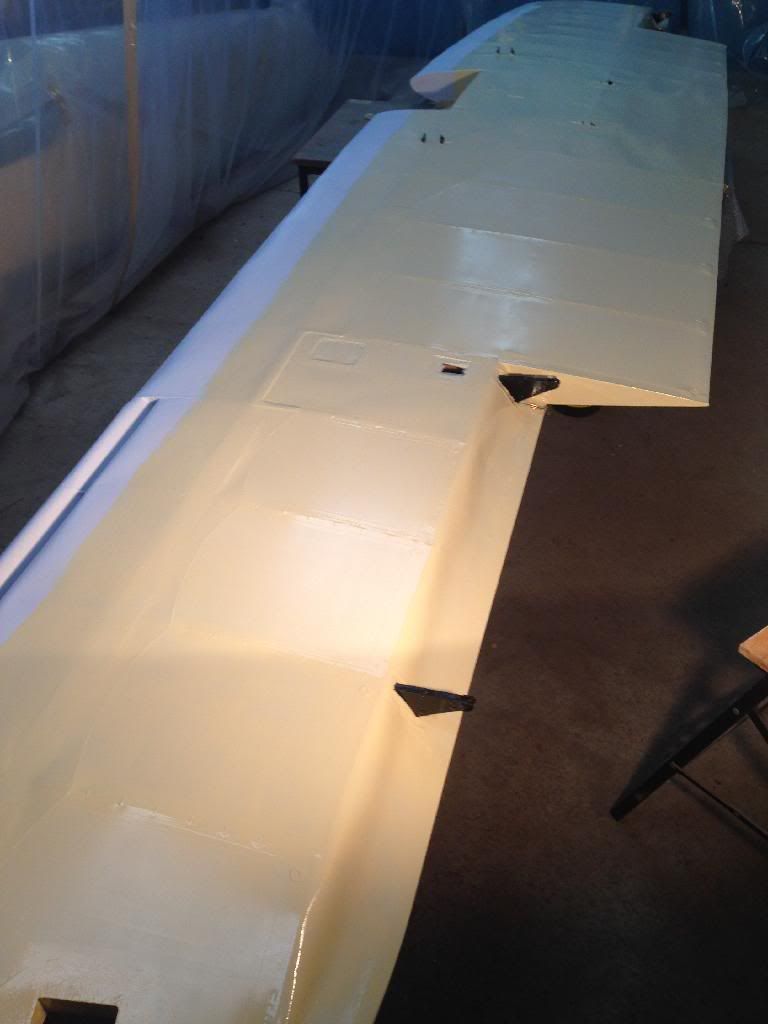
The wing as it is today, and pretty much ready for fabric
Items such as the undercarriage were sand blasted and thoroughly checked before re-priming and painting. The fuel tank was sent away for the addition of a new filler cap and neck, and for pressure testing. Rudder pedals were overhauled and put aside for installation, as were the wheels.
Sam has finished fabric covering the control surfaces and they're ready for painting.
Rudder with fresh fabric
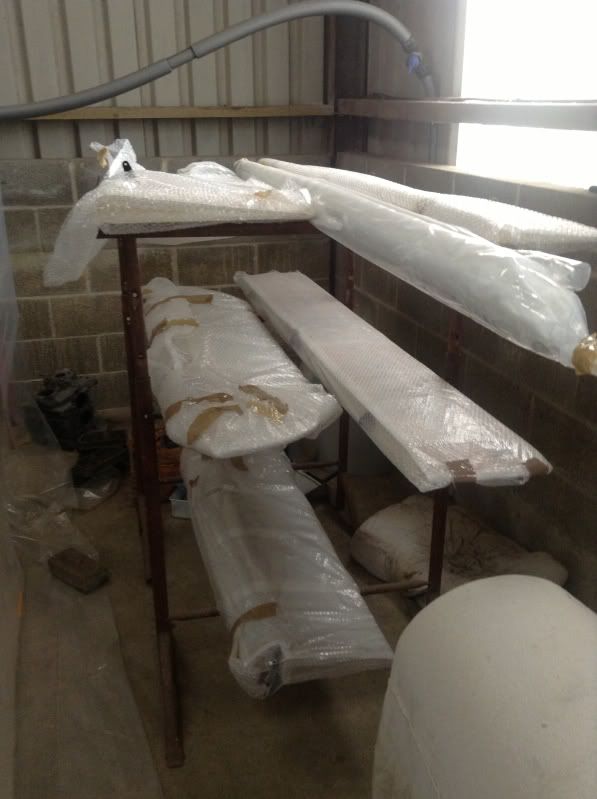
Control surfaces, fabric covered, bubble wrapped, stored, and ready for attachment.
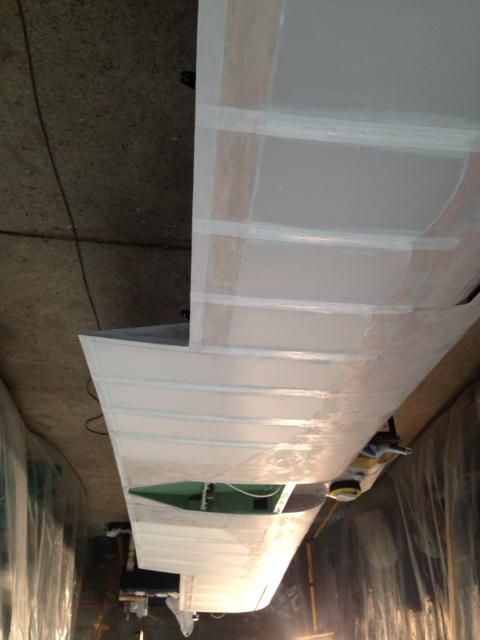
The next job is to fabric cover the fuselage and wing which will be happening in the next week or two.
Fuselage waiting for fabric.

We've been asked several times what colour scheme we will be going with. The main aim is to keep it period, and there were therefore two options.
1. A single colour, as most Turbulents are, with registration and single stripe in a different colour.
2. A classic two-colour scheme.
I was all for number one, until I saw a well known Turbulent at a fly-in I went to, and I fell in love with it. In my opinion it is a simply stunning scheme, with lovely colours (Ipswich Bus Green apparently).
G-ASHT - the prettiest little aircraft I think I have ever seen.
We couldn't really copy it as that would have been cheating, but we decided we could use the scheme with different colours. So, Sam made up a little fabric test panel and the two colours, (after much deliberation) were chosen.
Fabric test panel for trying out paint
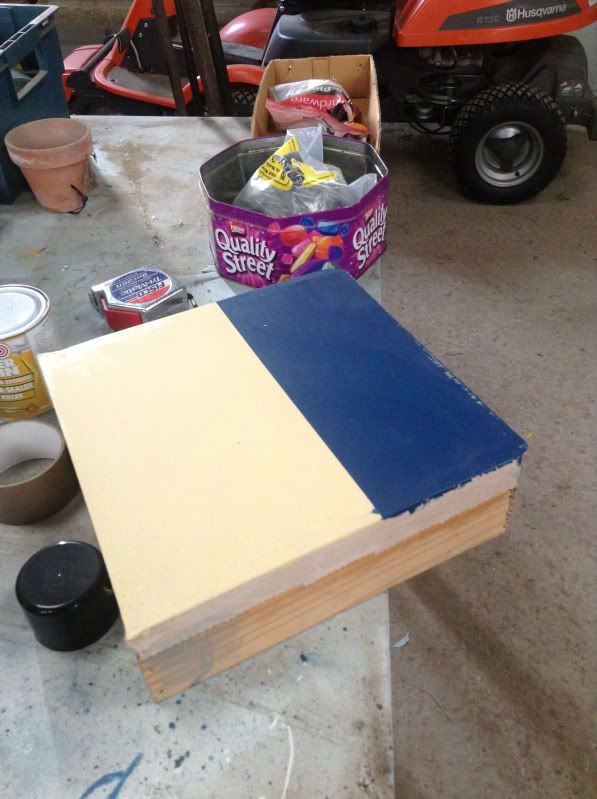
The Oxford Blue will be instead of the green, with the County Cream being the same. It'll look more like a Turb from the same clan, rather than a copy, I hope!! We took the opportunity to test out the strength of the fabric with the test panel. It has been:
1. Punched by my 12 year old son in an attempt to demonstrate his toughness. His fist came off worse than the fabric.
2. Bounced on like a trampoline by my 7 year old son.
3. Used as a axle stand for my quad bike when it had a puncture.
After such scientific test situations, I can formally report back that aircraft fabric is unbelievably strong and durable!!
17/09/13
A few weeks on, and harvest has been and gone. Sam has diligently been working on the Turb in the workshop, and I've been helping out when I can.
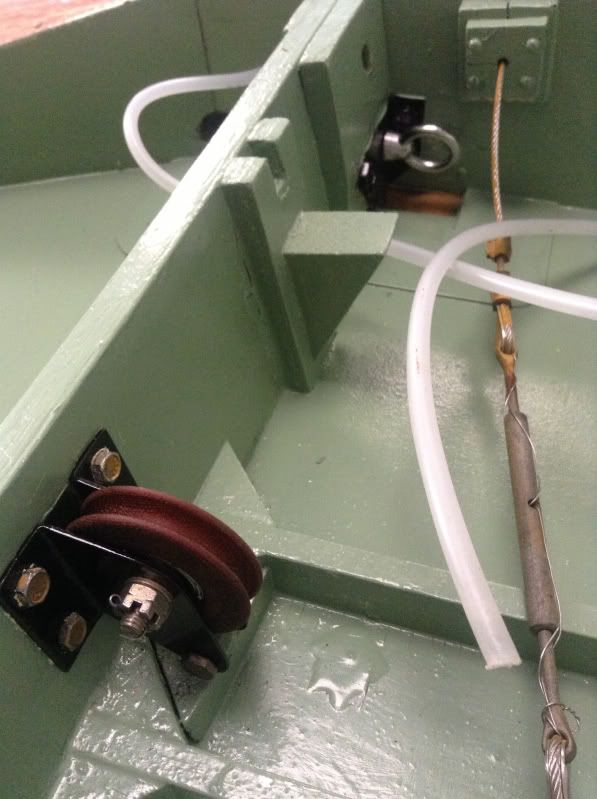
The focus has been on the wing and getting it finally ready for fabric. The control system had to be rigged up, with the freshly covered ailerons temporarily attached to their hanging brackets for new cables to be connected up to the stick, and pulleys were replaced with new. It all looks pretty darned snazzy and I now know why people say it's almost a shame to have to hide all the sexy bits with fabric.
Control system temporarily rigged up.
A couple of layers of glue over the wing later (to make sure the glue that goes all over the fabric has something to stick to) and we were ready to go.
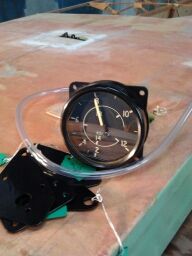
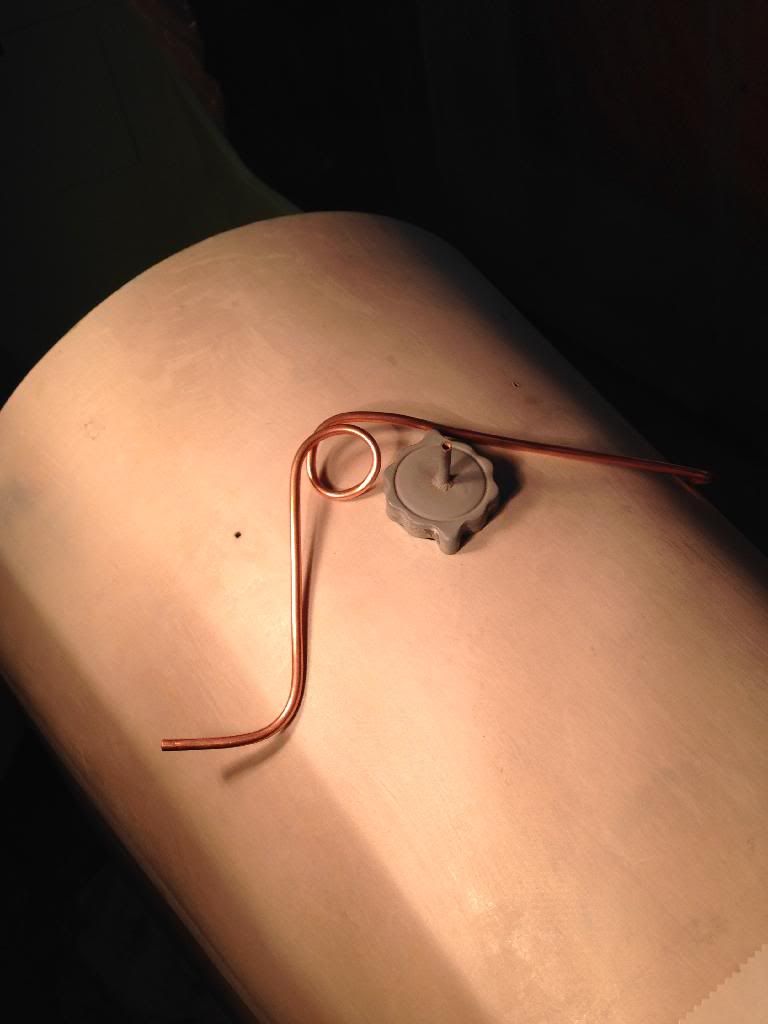
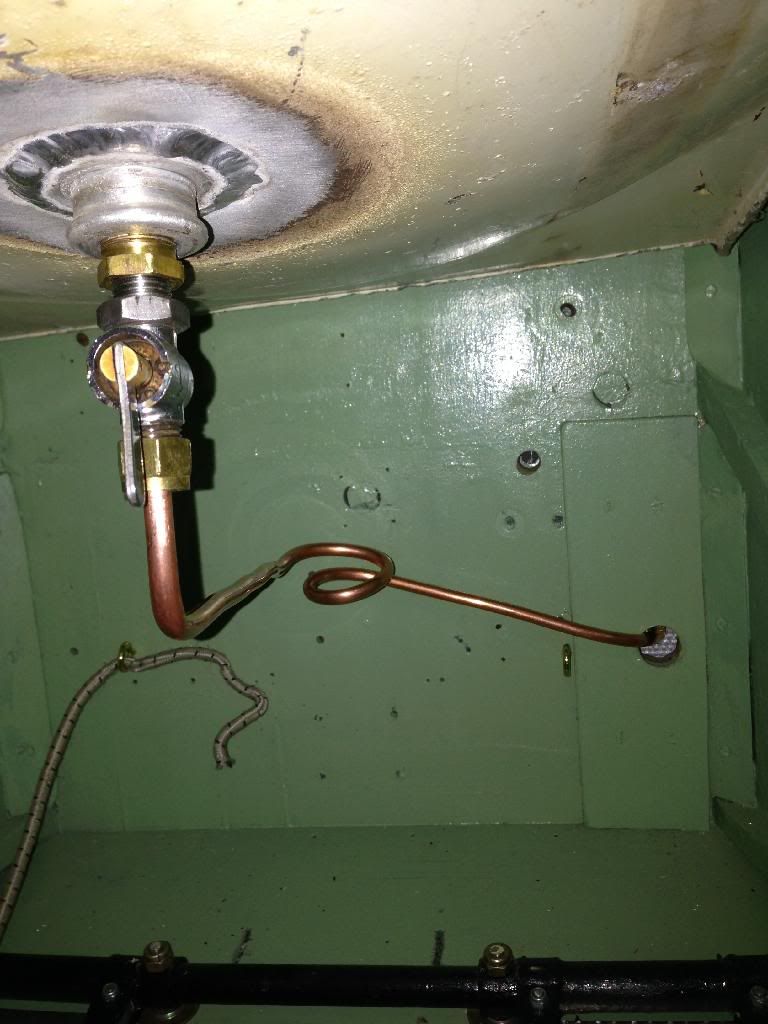
We had to make sure the pitot system worked properly before we considered covering, so a new pitot tube was made with some aluminium tube bought from LAS and the ASI was connected up and checked for sensible readings. It's a lovely instrument, and was found on eBay for �45!! It's brand new, with a manufactured date of circa 1950.
The next time 80kts is shown on this ASI we will be over the Berkshire countryside.
The first few posts will be a summary of where it is to date (with dates), and as long as PPRuNe don't mind, I will continue it here, with a hope to be flying by the end of April.
A friend and I decided in 2011 that we needed a project. He's recently retired and a clever man with aircraft building, having built and re-built his own LAA type, and with a very keen eye for detail and accuracy. We decided it would be a 50:50 owned aircraft and I had to quickly think of what I could offer to be of any value to the project bearing in mind what he'd be offering from a technical perspective. So, an area of a farm building was cleared out, and the Turbshop was born. The arrangement is that he provides the skills and all engineering input and I provide the premises and the funding for the project, as well as some of the monkey work. Put even more simply.... He's the brains, and I'm the bank. Despite us both wanting a stunning Turbulent at the end, I won't go as far as to say the project was without an upper budget spend, but if she needed it, she would get it.
We didn't know what we wanted to restore from the outset. I've always had a hankering for a single seat, open cockpit low wing monoplane. We scanned the ad's for a few months and one day G-ARIM appeared. She was started in 1961 by an Adolf Schima and despite then being owned by various parties since then, was never actually officially flown, despite being granted numerous Permits to Test. Her PFA number is 501, so she is certainly an early bird.
Adolf Shima, with G-ARIM in the 1960's. Note the strange engine he was using.
We have been told that Mr Shima died before 'IM was complete and she was then sold to another party, who also died before she was completed. If I start feeling a bit peaky I'll let you know....
We found her in Cambridgeshire, with another of her many owners (who looked refreshingly like he wasn't about to die), and she was still in many bits. Little bits of work had been carried out by each owner, and she had travelled around the country with a surprising amount of hardware to get her completed. A deal was done, and she was duly collected in a glider trailer the following week. Sam decided we shouldn't buy the engine that came with her and that we'd source another one. The provenance of the engine she came with was not known, and it looked like it would be a major overhaul job, which, for the money being asked for it, made it unviable.
Shortly after, an engine was sourced from a lovely man up in Lincolnshire direction who was building a Hurricane replica. It was Autumn 2012 by that point, and Sam wisely decided to focus on getting the engine sound while it was cold and damp, rather than work on the fuselage. I had a call one morning from Sam telling me he had managed to rig up an engine test bed. Imagine my surprise when I walked into the Turbshop to see a cleverly adapted bomb trolley, that was now a mobile engine test bed!!
The little VW, being tested by Deppity Dawg. I know it looks a little bit 'Yeehaa' but it was all carefully planned.
A little clip of the third run since major overhaul...
Many happy hours were spent over the Christmas spell freezing my baubles off in the propwash of the little VW, making sure the carb was properly set up, that the heat system worked, that the timing was spot on, and that she did a good few hours of ground running before we inhibited her prior to final installation. A word of advice..... aircraft engine test beds and horse livery yards aren't perfectly designed to mutually co-exist, but Mrs M didn't complain once.
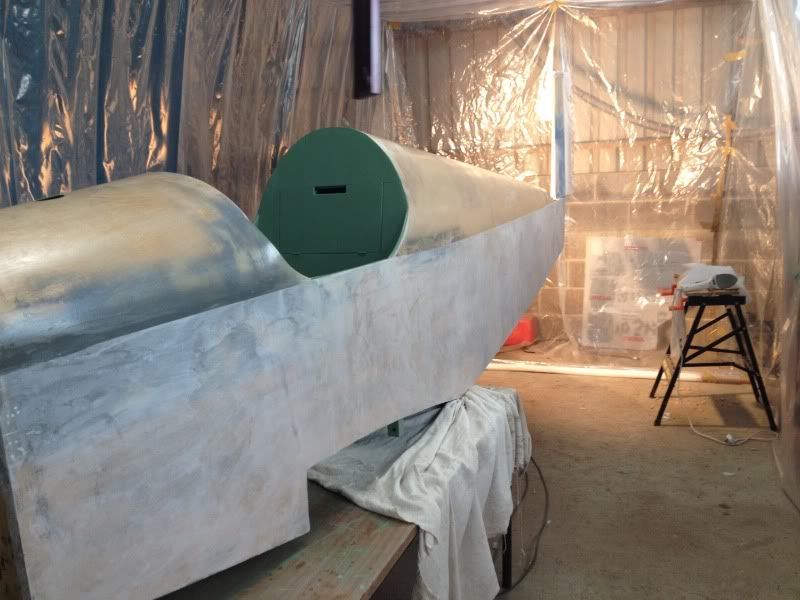
When we bought G-ARIM her fuselage was bare of fabric (but surprisingly intact) and her wings and control surfaces were fabric covered.
The wing, as we found it
The wing, after a stripping session.
We had planned to turn out an immaculate aircraft, and although one option would have been to accept the wing as it was, we decided to be completely thorough and strip the fabric off for a full inspection. Once this was done, the structure was surprisingly clean, constructed to a very high standard, and in good shape, although there was evidence of dampness at some point as some of the bolt heads were corroded. This wasn't a concern, as the plan had always been to replace them all anyway. The LAA inspector visited, and said what the man from Del Monte frequently says. We could keep progressing...
Many internal hardware items had rusted, despite their external ends being sound. A bit of an eye opener as to what could be lurking inside older aircraft...
Each and every bracket was removed, stripped and re-painted (that was one of the jobs I was trusted to do). Pulleys were replaced with new were necessary, all other hardware replaced with new regardless, any tiny wood joint weaknesses were strengthened, and new ply skin added where required. A slick little production line of metal parts worked their way through the home-made paint shop department of the Turbshop and then back into the assembly line for installation.
Paint shop
Sam's careful work
The wing as it is today, and pretty much ready for fabric
Items such as the undercarriage were sand blasted and thoroughly checked before re-priming and painting. The fuel tank was sent away for the addition of a new filler cap and neck, and for pressure testing. Rudder pedals were overhauled and put aside for installation, as were the wheels.
Sam has finished fabric covering the control surfaces and they're ready for painting.
Rudder with fresh fabric
Control surfaces, fabric covered, bubble wrapped, stored, and ready for attachment.
The next job is to fabric cover the fuselage and wing which will be happening in the next week or two.
Fuselage waiting for fabric.
We've been asked several times what colour scheme we will be going with. The main aim is to keep it period, and there were therefore two options.
1. A single colour, as most Turbulents are, with registration and single stripe in a different colour.
2. A classic two-colour scheme.
I was all for number one, until I saw a well known Turbulent at a fly-in I went to, and I fell in love with it. In my opinion it is a simply stunning scheme, with lovely colours (Ipswich Bus Green apparently).
G-ASHT - the prettiest little aircraft I think I have ever seen.
We couldn't really copy it as that would have been cheating, but we decided we could use the scheme with different colours. So, Sam made up a little fabric test panel and the two colours, (after much deliberation) were chosen.
Fabric test panel for trying out paint
The Oxford Blue will be instead of the green, with the County Cream being the same. It'll look more like a Turb from the same clan, rather than a copy, I hope!! We took the opportunity to test out the strength of the fabric with the test panel. It has been:
1. Punched by my 12 year old son in an attempt to demonstrate his toughness. His fist came off worse than the fabric.
2. Bounced on like a trampoline by my 7 year old son.
3. Used as a axle stand for my quad bike when it had a puncture.
After such scientific test situations, I can formally report back that aircraft fabric is unbelievably strong and durable!!
17/09/13
A few weeks on, and harvest has been and gone. Sam has diligently been working on the Turb in the workshop, and I've been helping out when I can.
The focus has been on the wing and getting it finally ready for fabric. The control system had to be rigged up, with the freshly covered ailerons temporarily attached to their hanging brackets for new cables to be connected up to the stick, and pulleys were replaced with new. It all looks pretty darned snazzy and I now know why people say it's almost a shame to have to hide all the sexy bits with fabric.
Control system temporarily rigged up.
A couple of layers of glue over the wing later (to make sure the glue that goes all over the fabric has something to stick to) and we were ready to go.
We had to make sure the pitot system worked properly before we considered covering, so a new pitot tube was made with some aluminium tube bought from LAS and the ASI was connected up and checked for sensible readings. It's a lovely instrument, and was found on eBay for �45!! It's brand new, with a manufactured date of circa 1950.
The next time 80kts is shown on this ASI we will be over the Berkshire countryside.
Last edited by Monocock; 21st Feb 2014 at 14:12.

Thread Starter
Join Date: Jan 2002
Location: Earth
Posts: 1,189
Likes: 0
Received 0 Likes
on
0 Posts
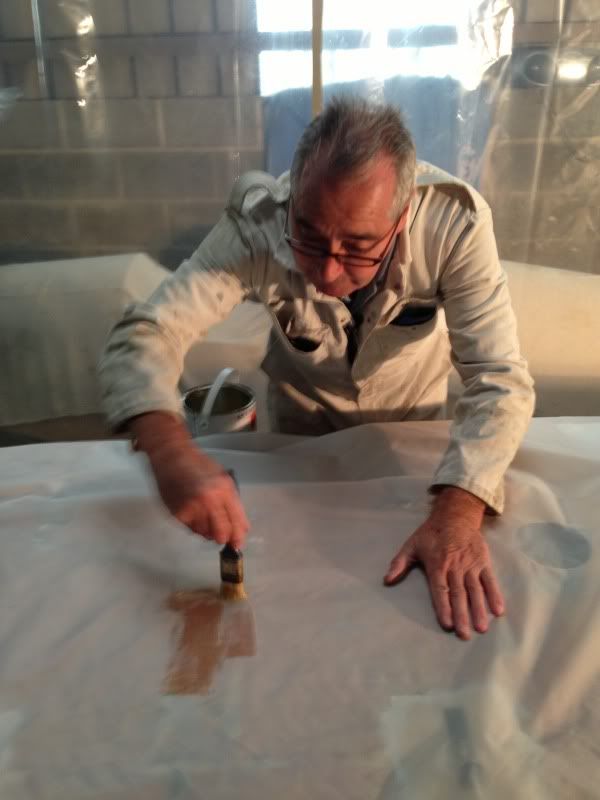
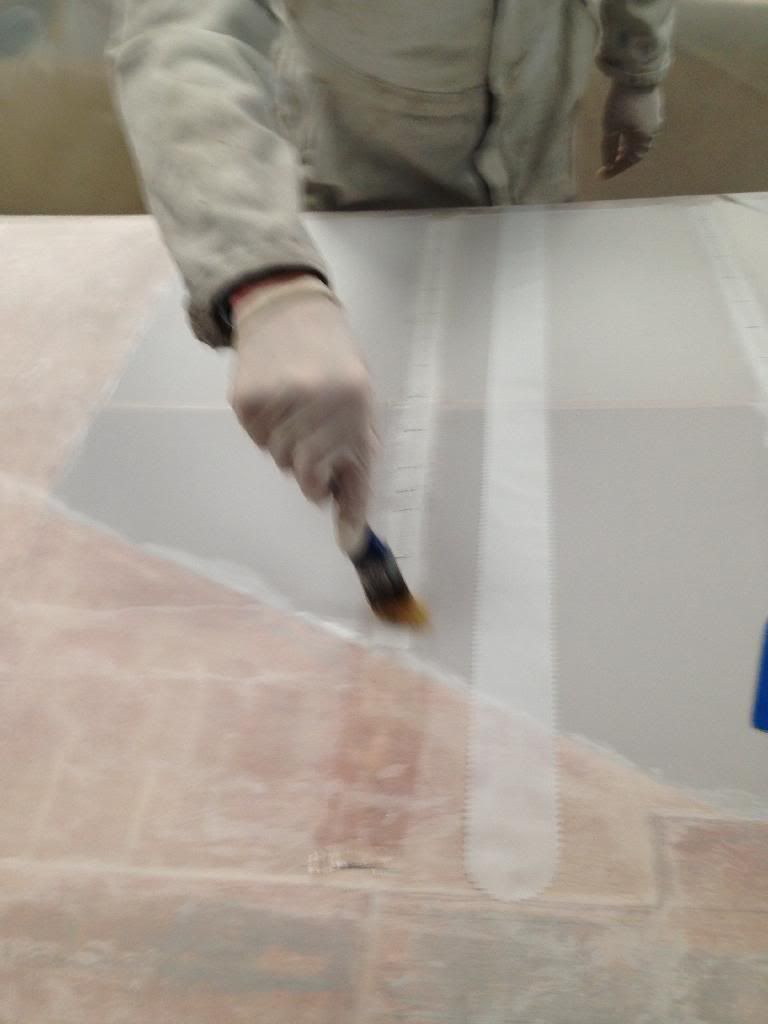
With temperature for fabric work being important, we managed to get the poly-booth up to at least 16 degrees for the glue to dry properly. A little electric heater and some free-standing lamps did the job, and we were toasty.
The fabric was laid out across the underside of the wing (underside done first so the top layer overlaps over the leading edge by a couple of inches). Sam spent a good 10 minutes making sure the weave in the fabric was nicely lined up with the wing.
It was then clamped out, to ensure it doesn't move when applying the glue. Starting at the middle, the glue is applied so it penetrates the fabric and bonds with the previously applied glue layers on the plywood airframe. We worked away from centre, keeping the fabric straight, re-clamping when required, and brushing away to get as much adhesion as possible.
The first glob
Getting the positioning right to avoid any creases or air bubbles.
After an hour or two we'd pretty much finished most of the underside of the wing, and were at the point where the fabric could be glued to the trailing edge. I won't deny I was pretty high on the fumes of the glue by this point....

Tomorrow, the plan is to attach the fabric to the trailing edge and then leave it for 24 hours to dry before we start the shrinking process.
I probably should have worn gloves today.... The glue drys and leaves a layer of well bonded gunk on hands. Peeling it off is almost as satisfying as popping bubble wrap, but it doesn't half feel weird.
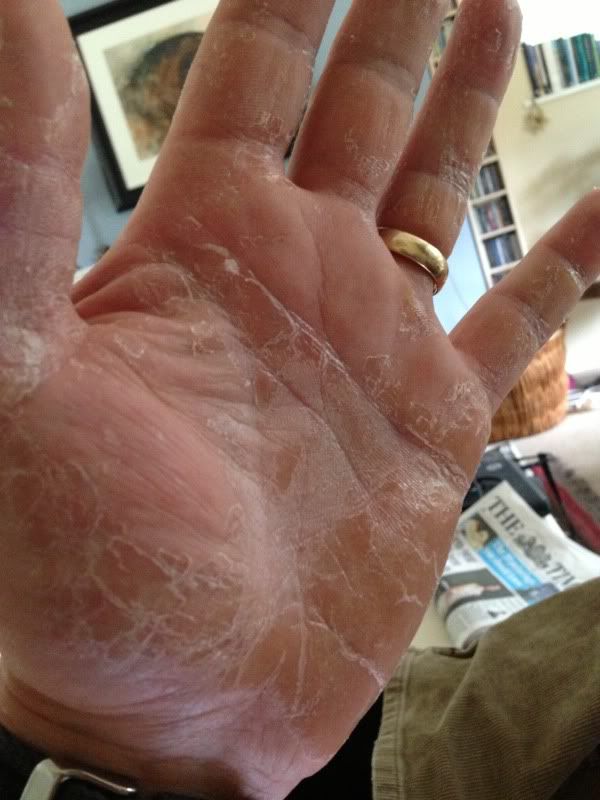
Turb' leprocy.
A quick before and after pair of pic's, just for interest...
Before...
After...
More to come later this week....
02/10/13
Gluing of underside of the wing finished today.
Fabric tightening tomorrow/Friday, and then the top side to do.
03/10/13
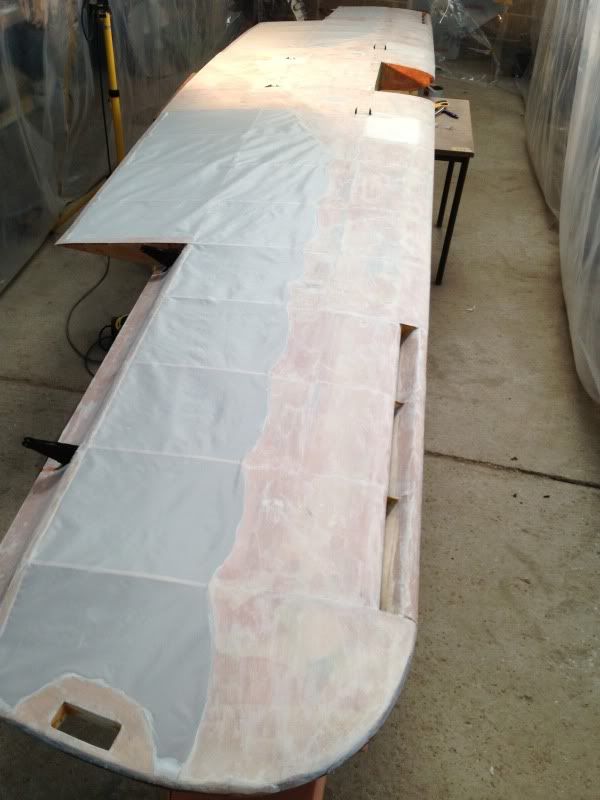
And today was the day. We finally have a wing that looks like a wing.
After much doping, gluing of fabric to ply sections and tinkering, it was time to shrink it.
Pre-shrink...
Followed by some smooth wrist action by Sam with the Morphy Richards...
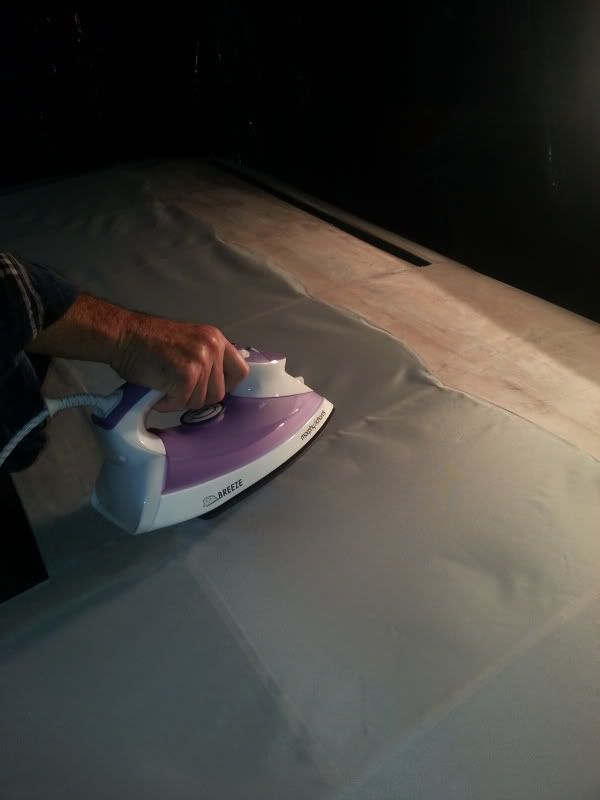
The temperature has to be taken up in stages, starting at 130 Celsius, and gradually increasing the temperature to 175 Celsius as you go. Max temp is 200 before it all goes pear shaped.
The fabric looked stunningly taught after shrinking and makes a satisfying twanging noise now when flicked.
After another hour the other side had been done and the wing is now ready for taping and stitching. Before anybody notices and comments, we are fully aware that we havn't yet cut out the wingtip hand-holds. That'll be a 5 minute job.
The Turbulent is a tiny aircraft, and the last few weeks have made me appreciate the number of hours that would go into doing a re-cover on something like a Cub/Auster sized aircraft.
We will be wrapping the wing in a protective layer of bubble wrap and putting it aside now. Although the taping and stitching is next, we are waiting to hear from the LAA as to whether our proposed painting system will be acceptable. Their response largely determines the method/timing of stitching. More on that later.
Next job will be to get the fuselage onto the operating table. That also requires fabric covering. That dope/glue doesn't half send you high
The fabric was laid out across the underside of the wing (underside done first so the top layer overlaps over the leading edge by a couple of inches). Sam spent a good 10 minutes making sure the weave in the fabric was nicely lined up with the wing.
It was then clamped out, to ensure it doesn't move when applying the glue. Starting at the middle, the glue is applied so it penetrates the fabric and bonds with the previously applied glue layers on the plywood airframe. We worked away from centre, keeping the fabric straight, re-clamping when required, and brushing away to get as much adhesion as possible.
The first glob
Getting the positioning right to avoid any creases or air bubbles.
After an hour or two we'd pretty much finished most of the underside of the wing, and were at the point where the fabric could be glued to the trailing edge. I won't deny I was pretty high on the fumes of the glue by this point....
Tomorrow, the plan is to attach the fabric to the trailing edge and then leave it for 24 hours to dry before we start the shrinking process.
I probably should have worn gloves today.... The glue drys and leaves a layer of well bonded gunk on hands. Peeling it off is almost as satisfying as popping bubble wrap, but it doesn't half feel weird.
Turb' leprocy.
A quick before and after pair of pic's, just for interest...
Before...
After...
More to come later this week....
02/10/13
Gluing of underside of the wing finished today.
Fabric tightening tomorrow/Friday, and then the top side to do.
03/10/13
And today was the day. We finally have a wing that looks like a wing.
After much doping, gluing of fabric to ply sections and tinkering, it was time to shrink it.
Pre-shrink...
Followed by some smooth wrist action by Sam with the Morphy Richards...
The temperature has to be taken up in stages, starting at 130 Celsius, and gradually increasing the temperature to 175 Celsius as you go. Max temp is 200 before it all goes pear shaped.
The fabric looked stunningly taught after shrinking and makes a satisfying twanging noise now when flicked.
After another hour the other side had been done and the wing is now ready for taping and stitching. Before anybody notices and comments, we are fully aware that we havn't yet cut out the wingtip hand-holds. That'll be a 5 minute job.
The Turbulent is a tiny aircraft, and the last few weeks have made me appreciate the number of hours that would go into doing a re-cover on something like a Cub/Auster sized aircraft.
We will be wrapping the wing in a protective layer of bubble wrap and putting it aside now. Although the taping and stitching is next, we are waiting to hear from the LAA as to whether our proposed painting system will be acceptable. Their response largely determines the method/timing of stitching. More on that later.
Next job will be to get the fuselage onto the operating table. That also requires fabric covering. That dope/glue doesn't half send you high
Thread Starter
Join Date: Jan 2002
Location: Earth
Posts: 1,189
Likes: 0
Received 0 Likes
on
0 Posts
15/11/13
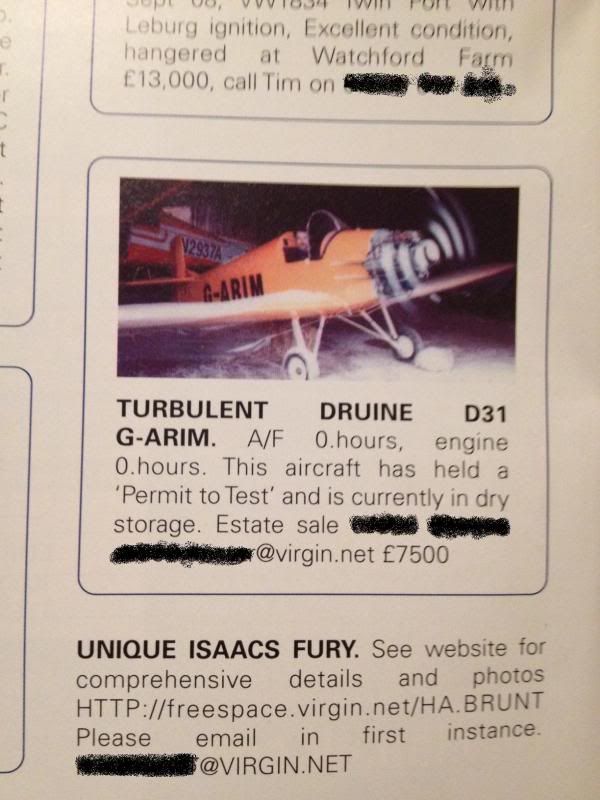
Interestingly, I was reading an old copy of a PFA magazine the other day, and saw this advert', for our Turb', which was printed several years ago. It was quite a spectacular asking price for a single seater, and with no Permit!! Added to which, it's an interesting place to test run an aircraft, in a hangar, and in front of another aircraft!!
I've also been contacted by a forumite who is another past-owner of G-ARIM, and who also has done some work on her!! He too saw evidence of flight when he bought her, so she's clearly got an interesting history, that nobody actually knows....!
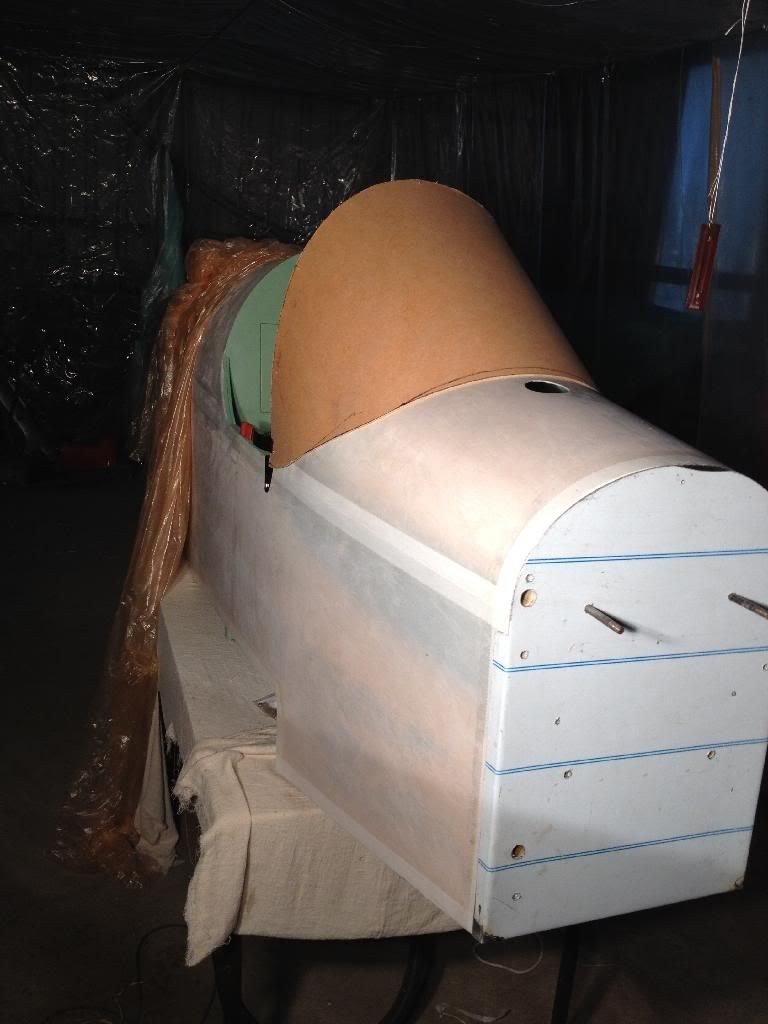
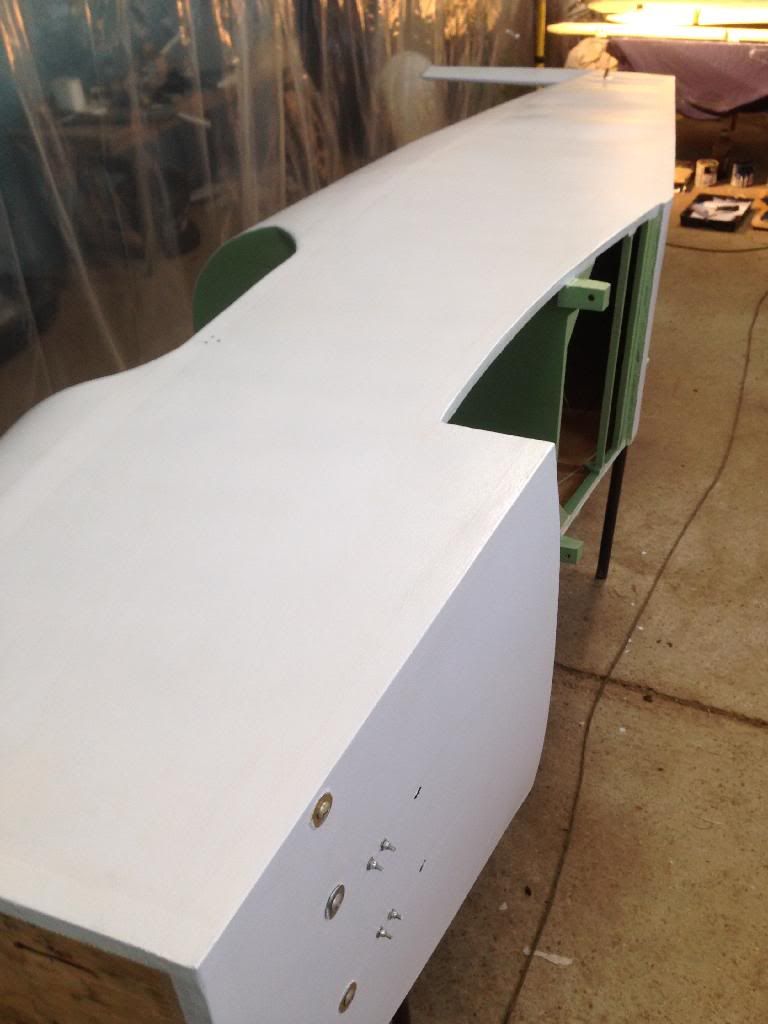
Since finishing the wing covering there have been quite a few bits to do on the fuselage before the fabric could be applied. Firstly, we had to store the wing somewhere dry and safe.
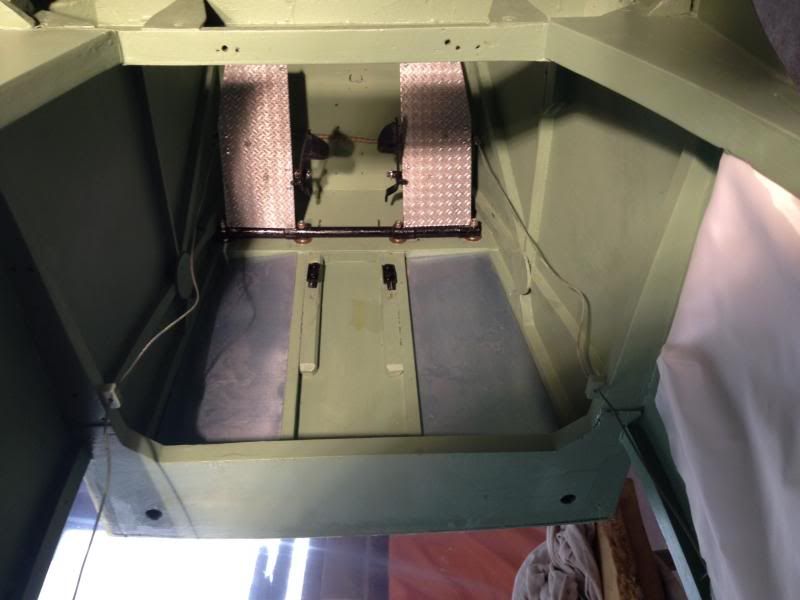
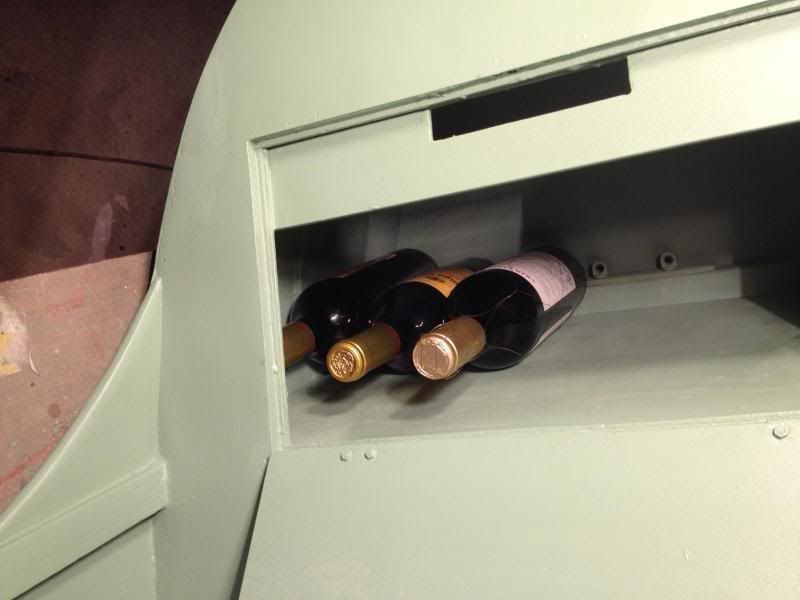
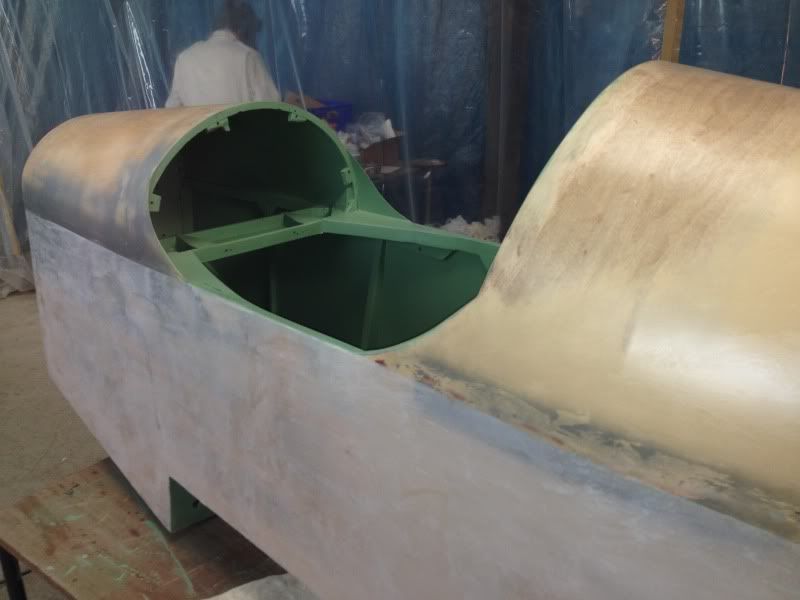
After that, the fusealge needed to have the cockpit area cleaned up and painted in my favourite colour - cockpit green. Note the "Rioja Locka" behind the pilot's head; a perfectly formed and sized storage space for wine, beer, gin and/or toothbrush. Note: this picture has been rotated as the fuselage was on its side when it was taken.
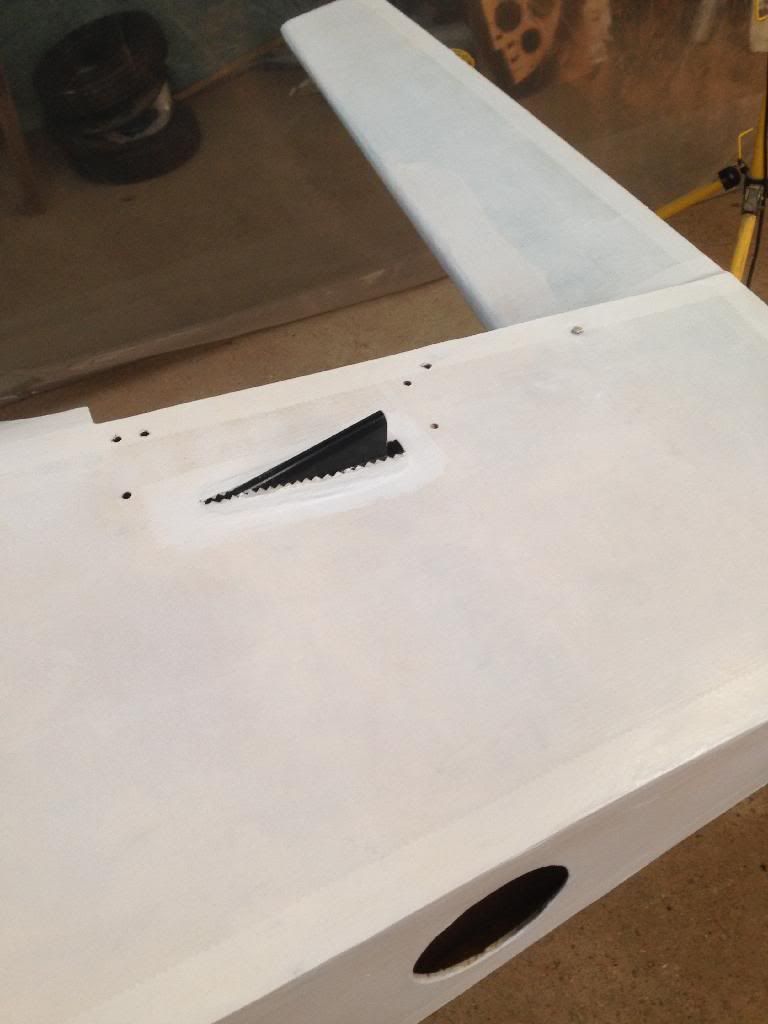
Then, the rudder pedals had to be attached. These had been overhauled beautifully by Sam some time ago, so was mainly a case of bolting on. Note the two metal footplates too, perfectly cut to size.
Following that, that tricky job of calculating where the rudder cables will exit the fuselage had to be worked out. Sam used some clever calcuation and his result came out absolutely spot on, with very little further exit point needing to be sanded/filed in the ply fuselage wall. Had that been me trying to do it, the exit hole would have been larger than a cat flap...
The fusealge fabric was started this morning. I felt a bt guilty as I had to rush out and repair some fencing that a horse had destroyed over the weekend so Sam had to fabric over a curving wooden surface on his own - and a lovely job he did too. We ironed/doped out any imperfections and the other side is now ready for the same tomorrow.
From here, and when the fuselage surface is finished, it's a case of attaching the firewall and instrument panel and sorting out the cable installation for throttle, carb heat, instrument cable drives etc. That will be a case of installing, getting it all sorted, and then temporarily uninstalling while painting takes place.
Several people have asked me how much space is needed for such a project. The answer is, not a lot really. It is amazing how clever you can be with space, and although we have plenty of it, the actual area needed is really quite small, especially for a small aircraft like this.
I've also been asked about costs involved. To be honest, it's hard to say as although we have kept a close tally on what we have spent, we haven't added it up yet. We will do this at the end, and as long as Sam is happy to disclose what has been spent, then I will summarise it if people are interested.
The thing that has amazed me, is how attached one can get to an aircraft when being involved so closely with its creation. I have spent over 20 years poling around the sky in aircraft I have had nothing to do with the construction of. I have never been able to say that I know an aircraft inside out, and have always slightly envied people who do. On this occassion though, I really do feel like she is a creation, rather than just an aircaft if that makes sense.
PS And you thought I was joking about the Rioja Locka...
03/12/13
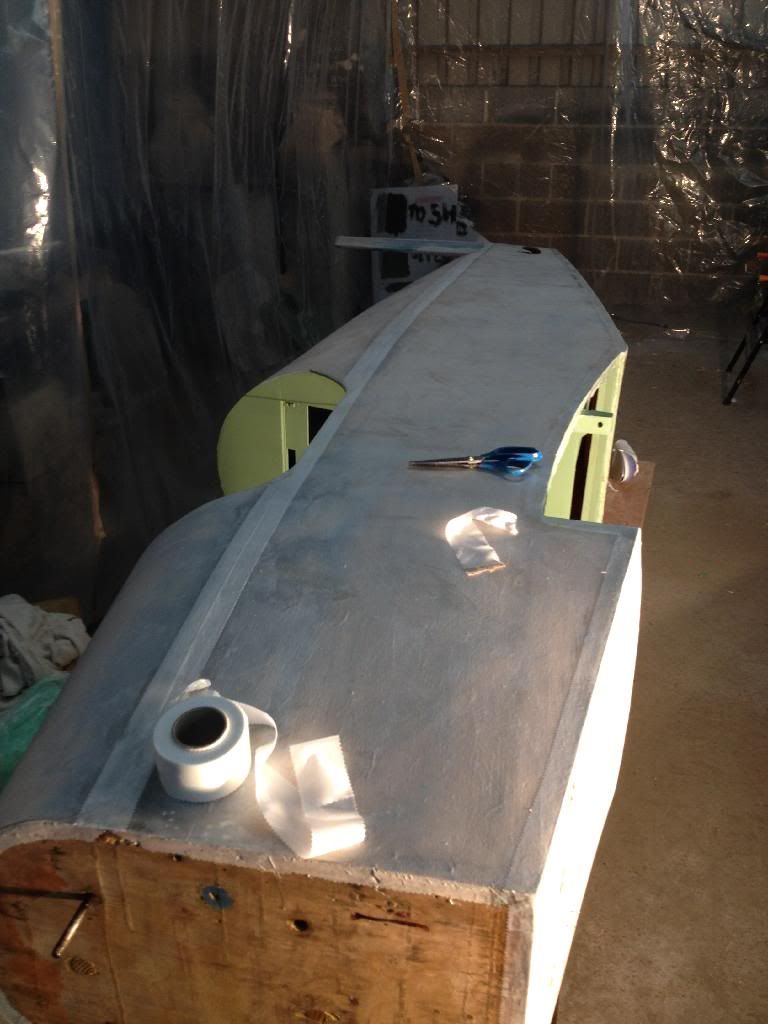
Fuselage fabric is pretty much finished now, with tapes going on today. It's all looking remarkably aircraft-like now, and getting progressively exciting to see less surface wood, and more surface fabric as the process proceeds.
There are some paperwork matters to deal with now (with the LAA) to finalise the painting method, and I'm hoping this won't take long... In the mean time, we have the panel to sort and the firewall to get installed. Next update pre-Christmas...
Having realised I need to be 12 stone to fly this, I've started my weight loss programme already. 9 lbs in 4 weeks, and with 19 to go. I'd like to get to 11 stone 8, which will allow me to carry full fuel, toothbrush, AND the Rioja, but will see how it goes.
Interestingly, I was reading an old copy of a PFA magazine the other day, and saw this advert', for our Turb', which was printed several years ago. It was quite a spectacular asking price for a single seater, and with no Permit!! Added to which, it's an interesting place to test run an aircraft, in a hangar, and in front of another aircraft!!
I've also been contacted by a forumite who is another past-owner of G-ARIM, and who also has done some work on her!! He too saw evidence of flight when he bought her, so she's clearly got an interesting history, that nobody actually knows....!
Since finishing the wing covering there have been quite a few bits to do on the fuselage before the fabric could be applied. Firstly, we had to store the wing somewhere dry and safe.
After that, the fusealge needed to have the cockpit area cleaned up and painted in my favourite colour - cockpit green. Note the "Rioja Locka" behind the pilot's head; a perfectly formed and sized storage space for wine, beer, gin and/or toothbrush. Note: this picture has been rotated as the fuselage was on its side when it was taken.
Then, the rudder pedals had to be attached. These had been overhauled beautifully by Sam some time ago, so was mainly a case of bolting on. Note the two metal footplates too, perfectly cut to size.
Following that, that tricky job of calculating where the rudder cables will exit the fuselage had to be worked out. Sam used some clever calcuation and his result came out absolutely spot on, with very little further exit point needing to be sanded/filed in the ply fuselage wall. Had that been me trying to do it, the exit hole would have been larger than a cat flap...
The fusealge fabric was started this morning. I felt a bt guilty as I had to rush out and repair some fencing that a horse had destroyed over the weekend so Sam had to fabric over a curving wooden surface on his own - and a lovely job he did too. We ironed/doped out any imperfections and the other side is now ready for the same tomorrow.
From here, and when the fuselage surface is finished, it's a case of attaching the firewall and instrument panel and sorting out the cable installation for throttle, carb heat, instrument cable drives etc. That will be a case of installing, getting it all sorted, and then temporarily uninstalling while painting takes place.
Several people have asked me how much space is needed for such a project. The answer is, not a lot really. It is amazing how clever you can be with space, and although we have plenty of it, the actual area needed is really quite small, especially for a small aircraft like this.
I've also been asked about costs involved. To be honest, it's hard to say as although we have kept a close tally on what we have spent, we haven't added it up yet. We will do this at the end, and as long as Sam is happy to disclose what has been spent, then I will summarise it if people are interested.
The thing that has amazed me, is how attached one can get to an aircraft when being involved so closely with its creation. I have spent over 20 years poling around the sky in aircraft I have had nothing to do with the construction of. I have never been able to say that I know an aircraft inside out, and have always slightly envied people who do. On this occassion though, I really do feel like she is a creation, rather than just an aircaft if that makes sense.
PS And you thought I was joking about the Rioja Locka...
03/12/13
Fuselage fabric is pretty much finished now, with tapes going on today. It's all looking remarkably aircraft-like now, and getting progressively exciting to see less surface wood, and more surface fabric as the process proceeds.
There are some paperwork matters to deal with now (with the LAA) to finalise the painting method, and I'm hoping this won't take long... In the mean time, we have the panel to sort and the firewall to get installed. Next update pre-Christmas...
Having realised I need to be 12 stone to fly this, I've started my weight loss programme already. 9 lbs in 4 weeks, and with 19 to go. I'd like to get to 11 stone 8, which will allow me to carry full fuel, toothbrush, AND the Rioja, but will see how it goes.
Thread Starter
Join Date: Jan 2002
Location: Earth
Posts: 1,189
Likes: 0
Received 0 Likes
on
0 Posts
18/12/13
Well, the fabric work is all finished, and has been prepared for painting. I've learned a lot about fabric work, and the importance of careful preparation before going ahead with each stage. I'm now very conscious of the fact that the fabric application work isn't actually what takes the majority of the time, it's the attention to detail to get it looking really good that eats up the hours.
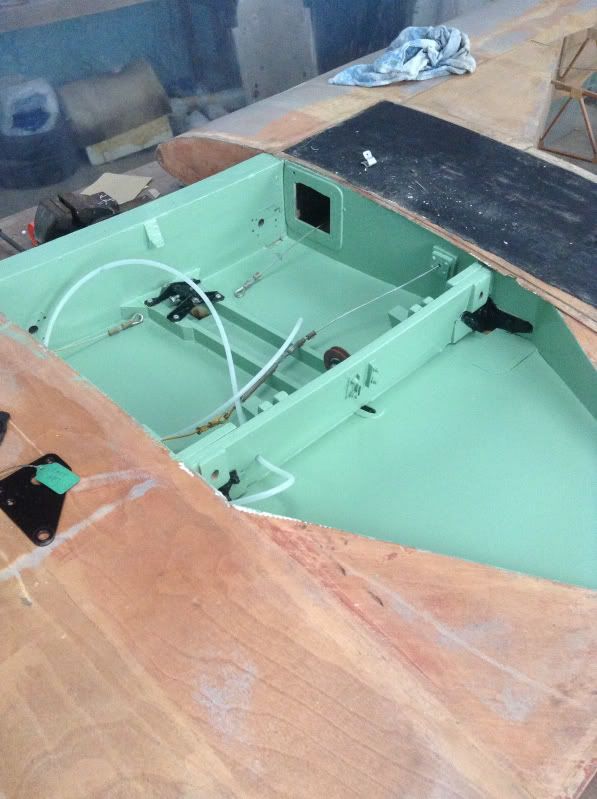
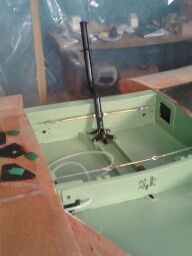
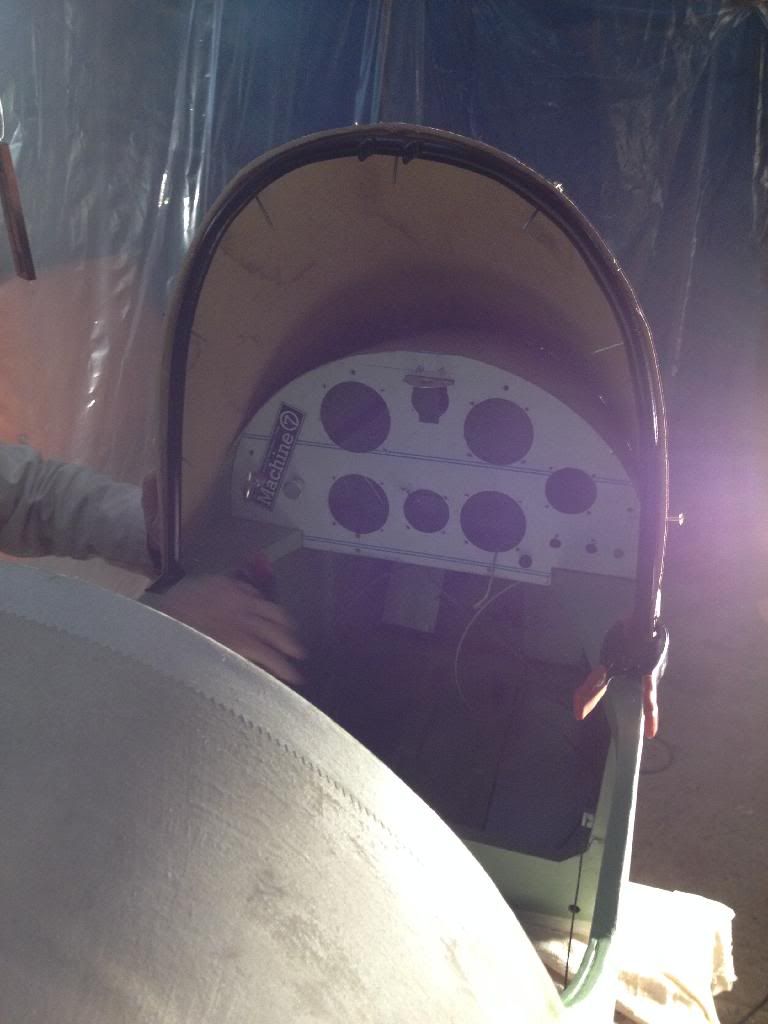
In the last week the firewall has been installed, along with a secondary fire retardant material shield between the fire wall and the wooden fuselage. The neat cable holes have been made for the carb heat, throttle and choke to pass through, and these controls have been attached to the panel. We had to make sure (by temporarily installing the fuel tank) that the cables weren't going to foul on the tank as they exited the back of the panel, and it's all looking pretty neat. We opted for carb heat and throttle to be on the left hand side of the panel, and choke to the lower right by the pilot's knee, to keep all flying controls above the level of the base of the panel.
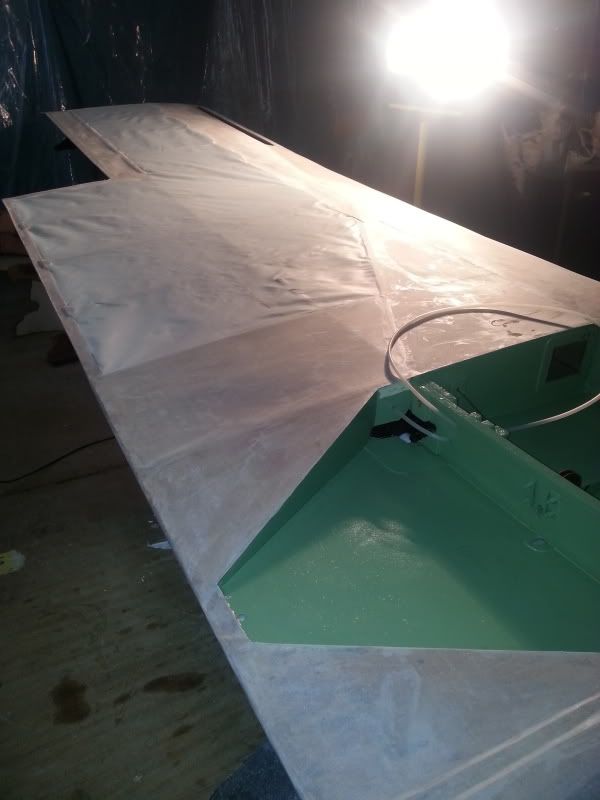
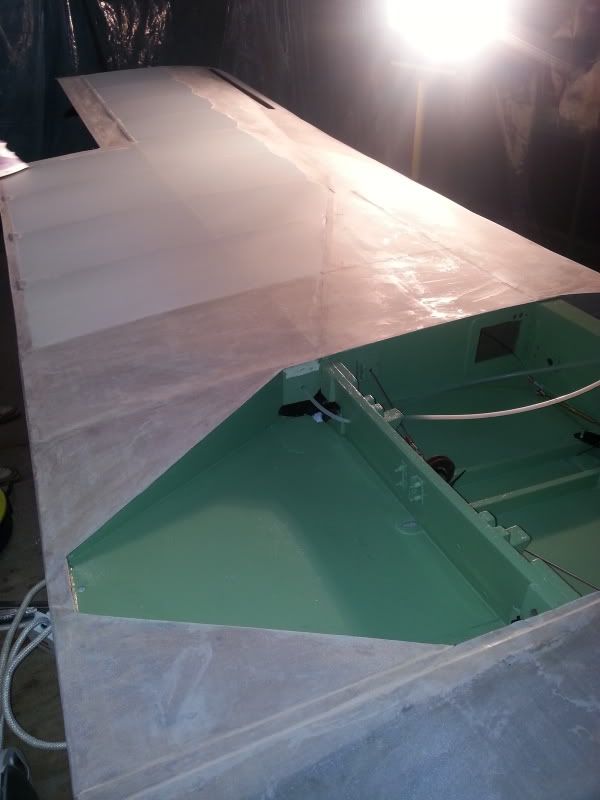
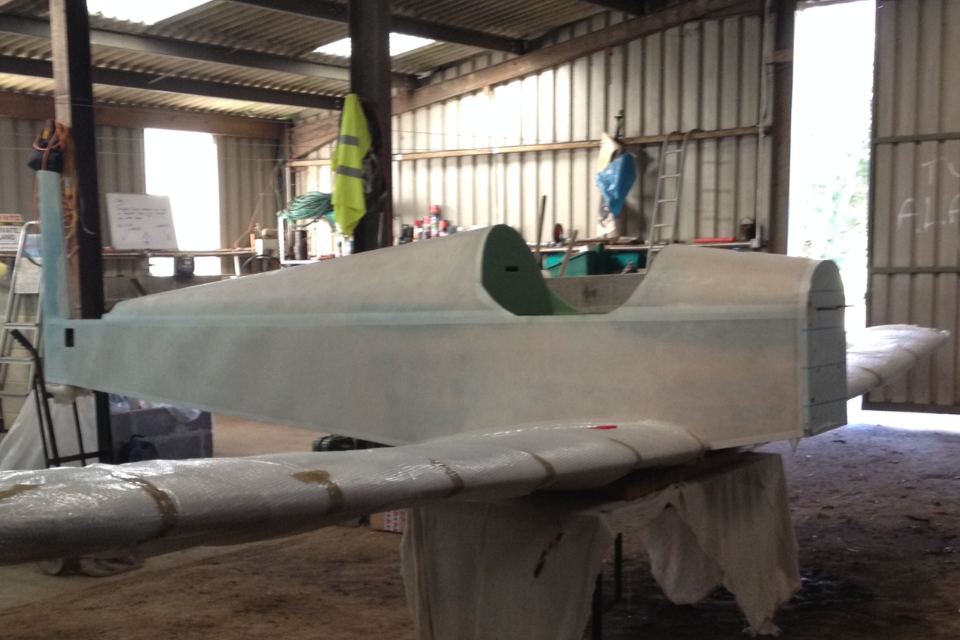
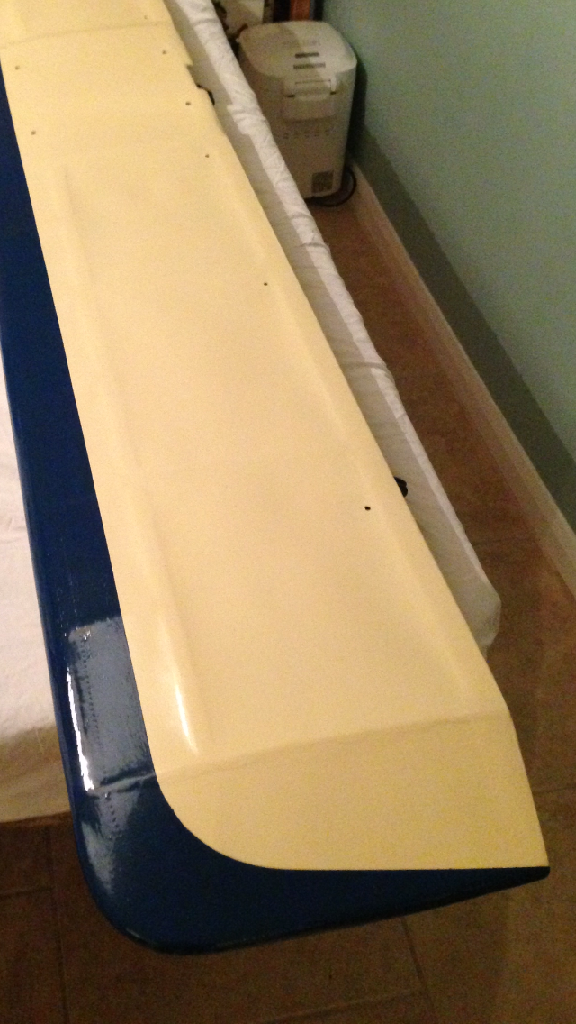
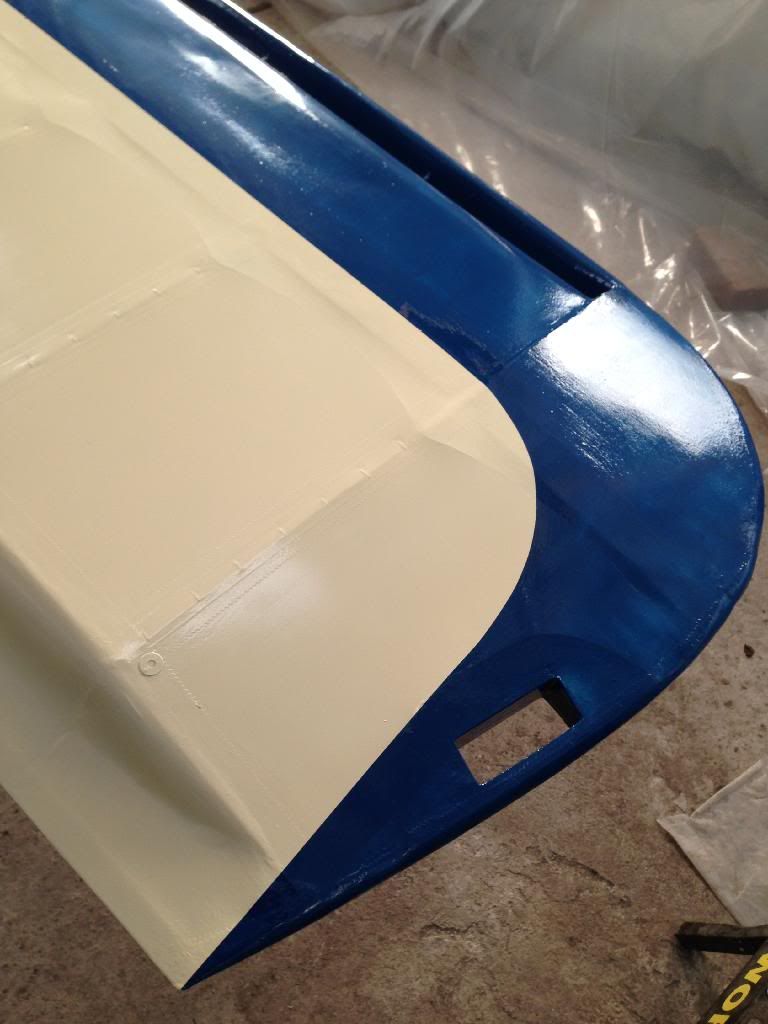
Today we decided it was time to temporarily attach the wing to the fuselage to firstly check it all lines up since the fabric work has been completed, and also to allow us to mark the points where the two colours will start and stop for the paint scheme.
As I think I have mentioned before, we are going with an Oxford Blue and cream version of the scheme below. It should look quite nice.
We lay the airframe out and it fitted together well, and without any difficulty. The bubble wrap on the wing (before anyone asks....!!) is purely to protect the recently shrunk/glued fabric whilst being stored and waiting for paint.

We are sorting out various trim parts at the moment too, such as the frame for the windshield which I'm in the process of painting.
Paperwork has been submitted to the LAA for a modification to the standard dope painting system, and we are hoping to hear back from them sometime soon.... As this mod' doesn't apply to the fuselage, we will be going ahead with the painting of that early in the New Year.
Looking at what's left to do, it's mainly a case of assembly once the paint is on. Sam (quite rightly) focused on various aspects of the restoration project at an early stage which now leaves us with putting it all together, rather than having restoration AND assembly to do at the same time.
Excitement level has gone from a 7 to an 8.5 for me in the past few weeks...!!!
02/01/14
We decided to tackle the windshield yesterday, making sure that painting (the next major step) doesn't happen before any of the fiddly jobs. The last thing we want is to be trialling different windshield shapes on and off the fresh new paint.
We made up a new template from one we already had which wasn't the best of fits. After using up a Christmas present packaging supply of cardboard, we finally cut one that had the shape we were looking for. The Lexan (my son asked if this was a lesbian from Texas (honest, he did )) will be cut later this week and mounting holes drilled before being put aside for final installation.
I've been putting off the cleaning up of the brake assembly as it looked fiddly. I went for it this morning and it turned out ok.
Manky brake assembly unit
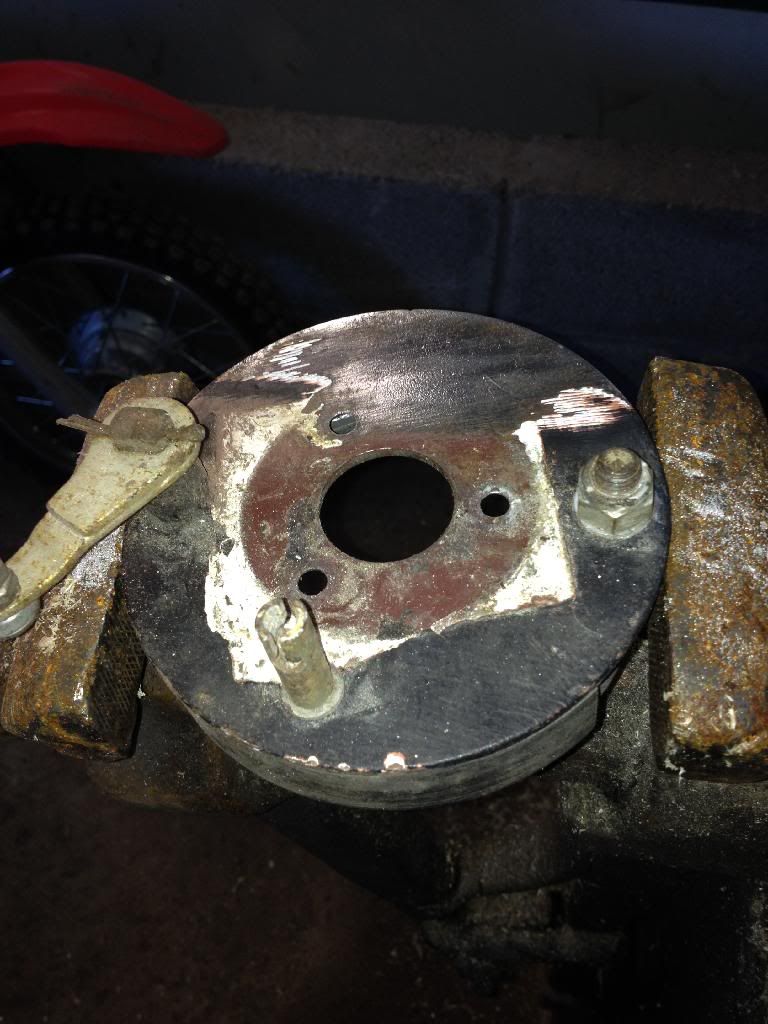
After some whizzing with my over-sized power tool...

And after painting.

I need to source some inner tubes/tyres for the wheels in the next few weeks. Does anybody have any good links for good scooter parts websites? We are pretty sure they'll be able to help us.
17/01/14
Well, it's taking shape nicely.
We've been building up to painting, and making sure nothing is forgotten beforehand. The last thing we want is to find we've painted her, and then there's something that needs doing that'll cock the paint finish up.
We needed to get the fuel tank plumbed in and we did this on Tuesday. The tank was temporarily installed so we could work out the direction of the pipework. After a few minutes of huffing and puffing, we (well, Sam actually), got the angle that was needed (with inbuilt 'spring' for engine movement) and we cut the ends for a secure fit.
The first photo took 4 takes because Sam was adamant I couldn't get his bald patch in the frame (!!) so please respect the fact that this was a carefully selected photo!!
Fuel pipe after some time of careful bending. The pipe was filled with salt and sealed so that the pipe wouldn't kink when bent to shape. Clever stuff.
Fuel pipe from tank, all neatly lined up. Note new tank outlet, pressure tested and good for years to come.
As part of our new paint system, we have been asked by the LAA to create a test panel. This is it, with rib stitching being done, ready for painting. It'll then spend several years being 'weathered' to assess how it deals with UV etc.
What I'm doing tonight, undercoating the flying surfaces. The new system is a case of undercoat x2, and then a finishing coat. It's 11 times cheaper, and has built in UV protection, a finish that's as good (if not better) than standard aircraft paint systems, and it takes a fraction of the time.
Next week, we will be painting the fuselage...
Well, the fabric work is all finished, and has been prepared for painting. I've learned a lot about fabric work, and the importance of careful preparation before going ahead with each stage. I'm now very conscious of the fact that the fabric application work isn't actually what takes the majority of the time, it's the attention to detail to get it looking really good that eats up the hours.
In the last week the firewall has been installed, along with a secondary fire retardant material shield between the fire wall and the wooden fuselage. The neat cable holes have been made for the carb heat, throttle and choke to pass through, and these controls have been attached to the panel. We had to make sure (by temporarily installing the fuel tank) that the cables weren't going to foul on the tank as they exited the back of the panel, and it's all looking pretty neat. We opted for carb heat and throttle to be on the left hand side of the panel, and choke to the lower right by the pilot's knee, to keep all flying controls above the level of the base of the panel.
Today we decided it was time to temporarily attach the wing to the fuselage to firstly check it all lines up since the fabric work has been completed, and also to allow us to mark the points where the two colours will start and stop for the paint scheme.
As I think I have mentioned before, we are going with an Oxford Blue and cream version of the scheme below. It should look quite nice.
We lay the airframe out and it fitted together well, and without any difficulty. The bubble wrap on the wing (before anyone asks....!!) is purely to protect the recently shrunk/glued fabric whilst being stored and waiting for paint.
We are sorting out various trim parts at the moment too, such as the frame for the windshield which I'm in the process of painting.
Paperwork has been submitted to the LAA for a modification to the standard dope painting system, and we are hoping to hear back from them sometime soon.... As this mod' doesn't apply to the fuselage, we will be going ahead with the painting of that early in the New Year.
Looking at what's left to do, it's mainly a case of assembly once the paint is on. Sam (quite rightly) focused on various aspects of the restoration project at an early stage which now leaves us with putting it all together, rather than having restoration AND assembly to do at the same time.
Excitement level has gone from a 7 to an 8.5 for me in the past few weeks...!!!
02/01/14
We decided to tackle the windshield yesterday, making sure that painting (the next major step) doesn't happen before any of the fiddly jobs. The last thing we want is to be trialling different windshield shapes on and off the fresh new paint.
We made up a new template from one we already had which wasn't the best of fits. After using up a Christmas present packaging supply of cardboard, we finally cut one that had the shape we were looking for. The Lexan (my son asked if this was a lesbian from Texas (honest, he did )) will be cut later this week and mounting holes drilled before being put aside for final installation.
I've been putting off the cleaning up of the brake assembly as it looked fiddly. I went for it this morning and it turned out ok.
Manky brake assembly unit
After some whizzing with my over-sized power tool...
And after painting.
I need to source some inner tubes/tyres for the wheels in the next few weeks. Does anybody have any good links for good scooter parts websites? We are pretty sure they'll be able to help us.
17/01/14
Well, it's taking shape nicely.
We've been building up to painting, and making sure nothing is forgotten beforehand. The last thing we want is to find we've painted her, and then there's something that needs doing that'll cock the paint finish up.
We needed to get the fuel tank plumbed in and we did this on Tuesday. The tank was temporarily installed so we could work out the direction of the pipework. After a few minutes of huffing and puffing, we (well, Sam actually), got the angle that was needed (with inbuilt 'spring' for engine movement) and we cut the ends for a secure fit.
The first photo took 4 takes because Sam was adamant I couldn't get his bald patch in the frame (!!) so please respect the fact that this was a carefully selected photo!!
Fuel pipe after some time of careful bending. The pipe was filled with salt and sealed so that the pipe wouldn't kink when bent to shape. Clever stuff.
Fuel pipe from tank, all neatly lined up. Note new tank outlet, pressure tested and good for years to come.
As part of our new paint system, we have been asked by the LAA to create a test panel. This is it, with rib stitching being done, ready for painting. It'll then spend several years being 'weathered' to assess how it deals with UV etc.
What I'm doing tonight, undercoating the flying surfaces. The new system is a case of undercoat x2, and then a finishing coat. It's 11 times cheaper, and has built in UV protection, a finish that's as good (if not better) than standard aircraft paint systems, and it takes a fraction of the time.
Next week, we will be painting the fuselage...
Thread Starter
Join Date: Jan 2002
Location: Earth
Posts: 1,189
Likes: 0
Received 0 Likes
on
0 Posts
18/01/14
While my painting of the control surfaces continues, Sam has been busy getting the panel sorted. He's pretty much finished, and here's how it looks.
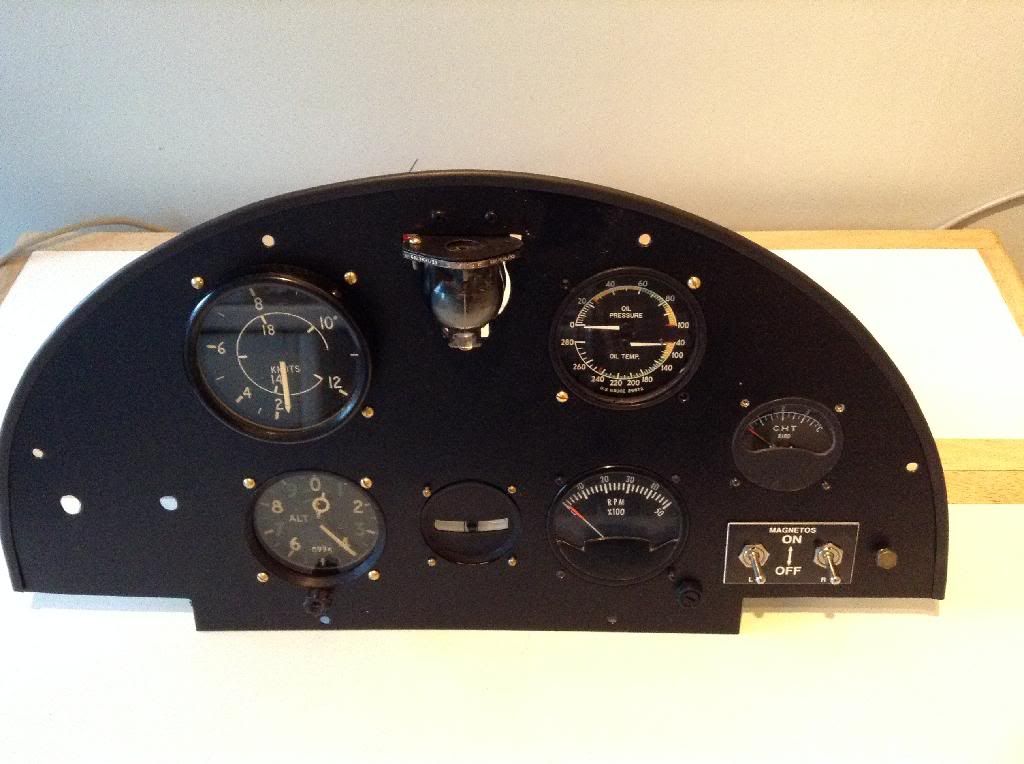
The paint scheme is a system that's used a lot in America, and that we are currently getting approval from the LAA for, for use on the wing's (unsupported fabric) structure. To save the traditional long-winded spray system requiring various coats of stinky and expensive paints, the system involves applying two layers of smooth exterior paint, followed by a coat of external trade standard gloss. All layers can be rollered on, creating a superb finish when a fine grade foam roller is used. The paints have inbuilt UV protection, are fire resistant and are non-toxic. As a system, it has been used on various aircraft (Minimax etc) with success, including some well known British red display jets...
The test panel we have made is a requirement of the LAA as a panel that will be stored outside once completed to allow is to regularly check it's condition.
18/01/14
If someone had told me five years ago that there'd be a day when I chose to stay in a workshop working on an aircraft build instead of go flying, I'd have laughed. Well, the sun is out today and the Cub has stayed in the hangar, so I can paint!! My wife put my headsets out on the breakfast table and was a bit surprised to see them still there at 1100 hrs.
Lots of progress in the past 48 hours. I've focused on the control surfaces first, giving them two base coats and two light gloss coats. I'm pleased that the fabric weave is still visible through the paint, indicating that the coats have been the right thickness. The finish provided by this system is pretty impressive, although it does require one to be a little on the obsessive side to get it right.
Aileron x1, tailplane and elevator.
Fuselage with two base coats and awaiting first light gloss coat. I plan to do that tonight.
Bit more of the fuse
A half finished aileron
Ideally, I'd like to have the painting all wrapped up by the end of next week. Getting the lines in the right place where the two colours meet will take some planning, but I'm pretty sure I've worked out how to do it safely.
21/01/14
Well, today was a boy's trip out to buy a propeller for ARIM.
We knew there was only one real option for something that would maximise performance and I called Rupert Wasey at Hercules Propellers yesterday to check it was ok to call in and see him today. He said to call in whenever, and that he would be there.
What a lovely chap and what a superb business!!
We had a full guided tour of what can only be described as an aviator's heaven. We saw the whole system in detail from the beech raw material 'planks', through the bonding process, then the CNC process, followed by the hand crafting section, and finally followed by the finishing and painting section.
We knew we were going to buy one before we arrived, but by the time we left we were very close to ordering three. One for the Turb, one for my Cub, and one for Sam's Luton. The Turb one is ordered, and the Cub/Luton ones are very soon to be...
Thanks Rupert (in case you ever read this). You gave us more of your time than we expected and it was appreciated.
There's no point in a boy's trip out without a pub lunch (we tried driving to Kemble's Aviator but couldn't find the right way in once through the main gate to the airfield! ) so we went to an old haunt of mine when I was at Ag' college near there.
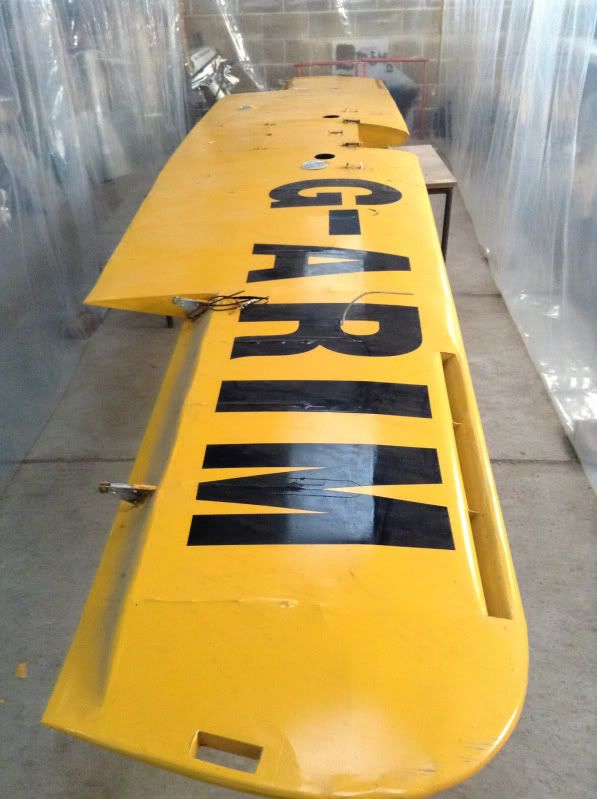
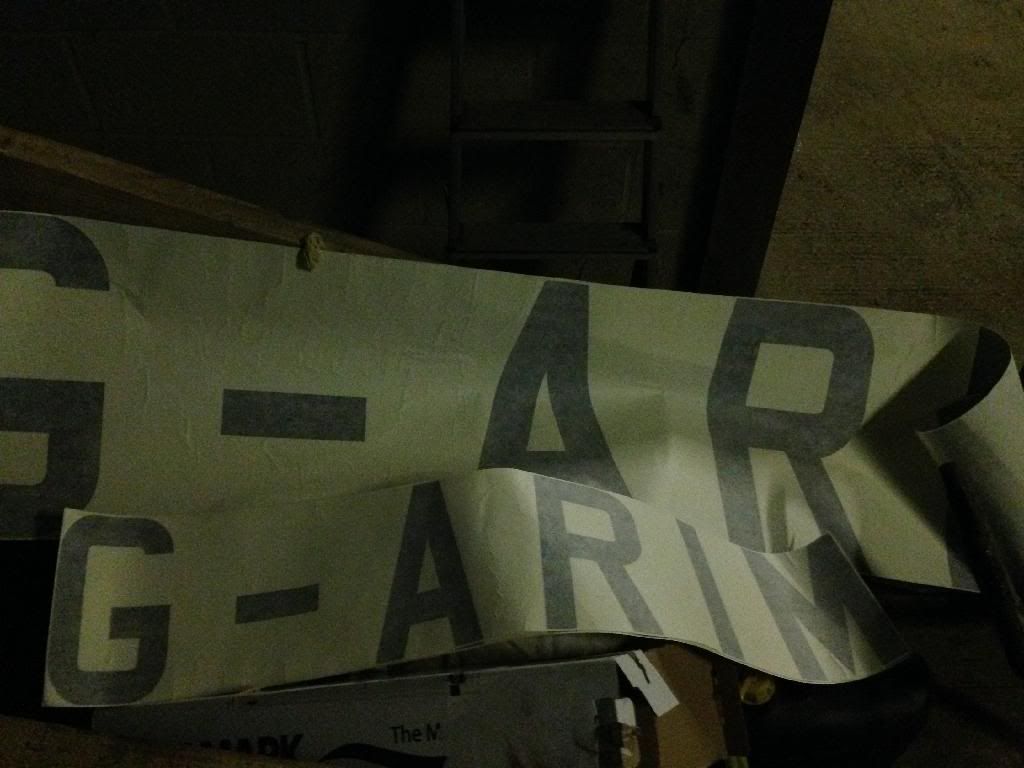
When I arrived home I was pleased to see that the registration lettering had arrived. Mirage Signs (Warminster) did them and they were incredibly helpful throughout the whole ordering process, and I can highly recommend them. Ask for Pete; he's a top chap.
Then, an hour's painting of flying control surfaces, and it's time for meatball arrabbiatta with linguine.
I can feel another project coming on.....
21/01/14
Had a look at the reg letters that arrived a couple of days ago. They are spot on, and it feels like she finally has an identity.
I didn't realise quite how much time it would take choosing a suitable font. The initial ones we were offered were either very modern looking, or just too 'harsh'. In the end we trawled through loads of other Turb pics and found a font we liked. It turned out that it was an option and is a post-war RAF font. We like it anyway. Does anyone know its official name?
When discussing the reg font with Mrs M a week or two ago, she (with her reasonable GA knowledge) asked if we had considered re-registering the Turb in Germany. I asked why on earth we would want to do that. Her response, which was well thought out, and still makes me laugh now, was...
"Well you could register it D-UREX, because it's a pretty good contraceptive with you out in the workshop all night".
24/01/14
28/01/14
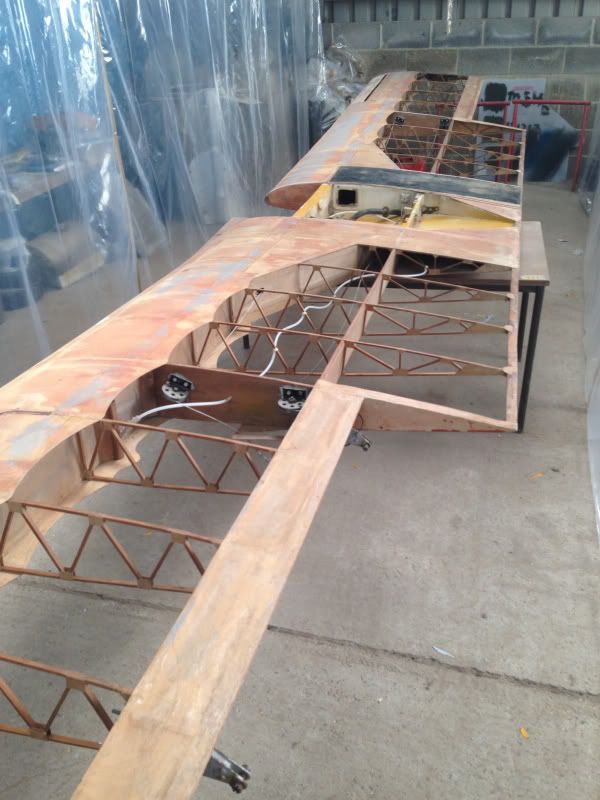
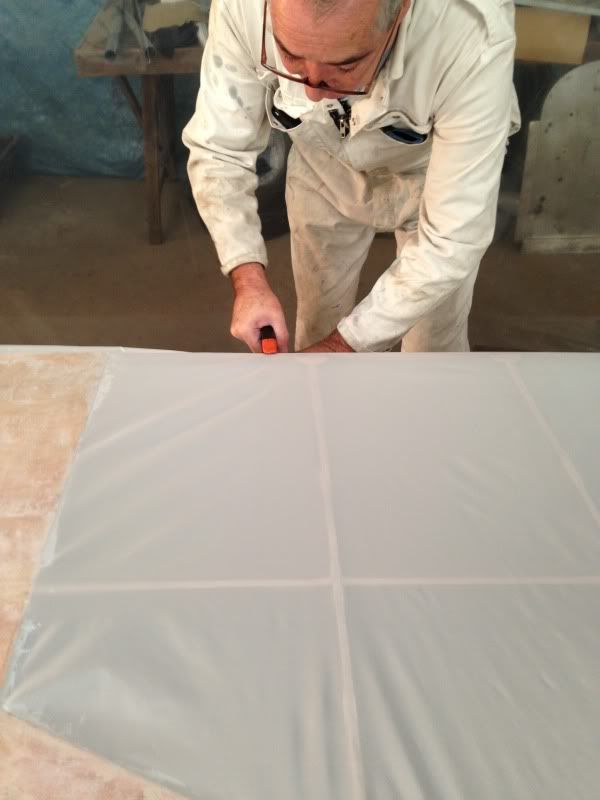
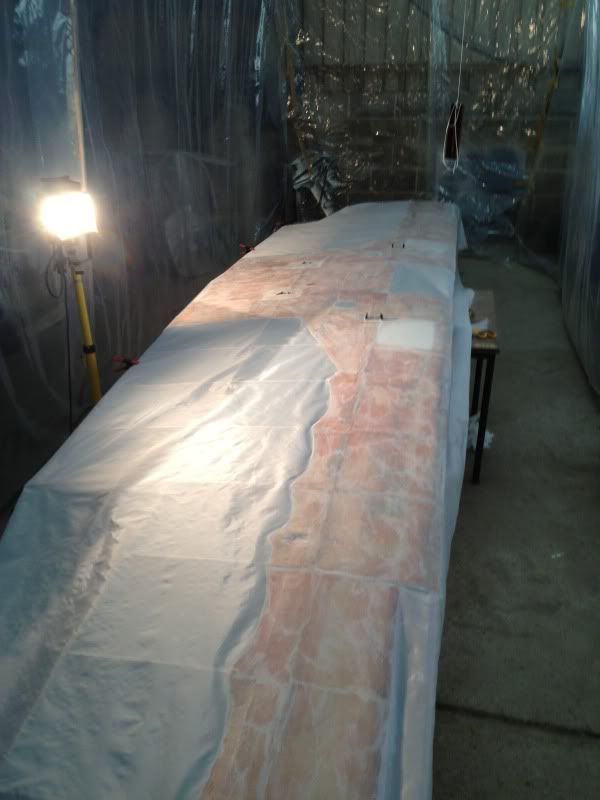
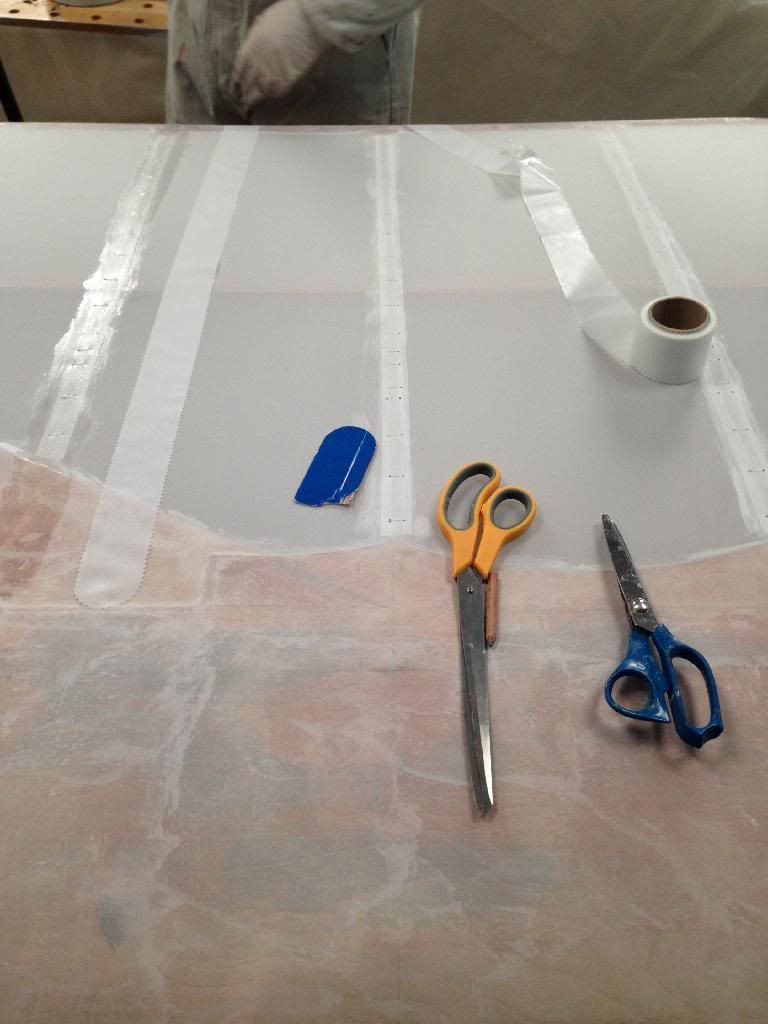
With the fuselage set aside for a week to let the first colour of paint harden (I'm still worrying that removing the masking tape after I apply the second colour will take a neat line of the first colour off...), we decided to make the most of the time and get the wing ribs stitched and taped.
Putting the one-piece wing back in the cowshed reminded me how big it is compared to the fuselage.
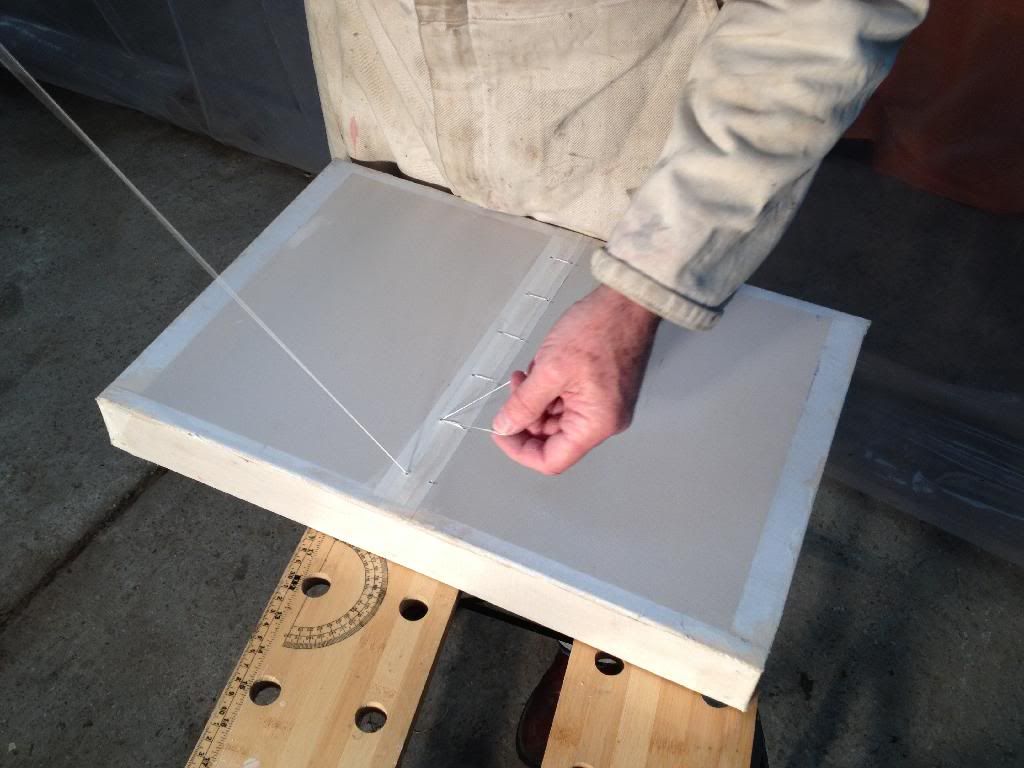
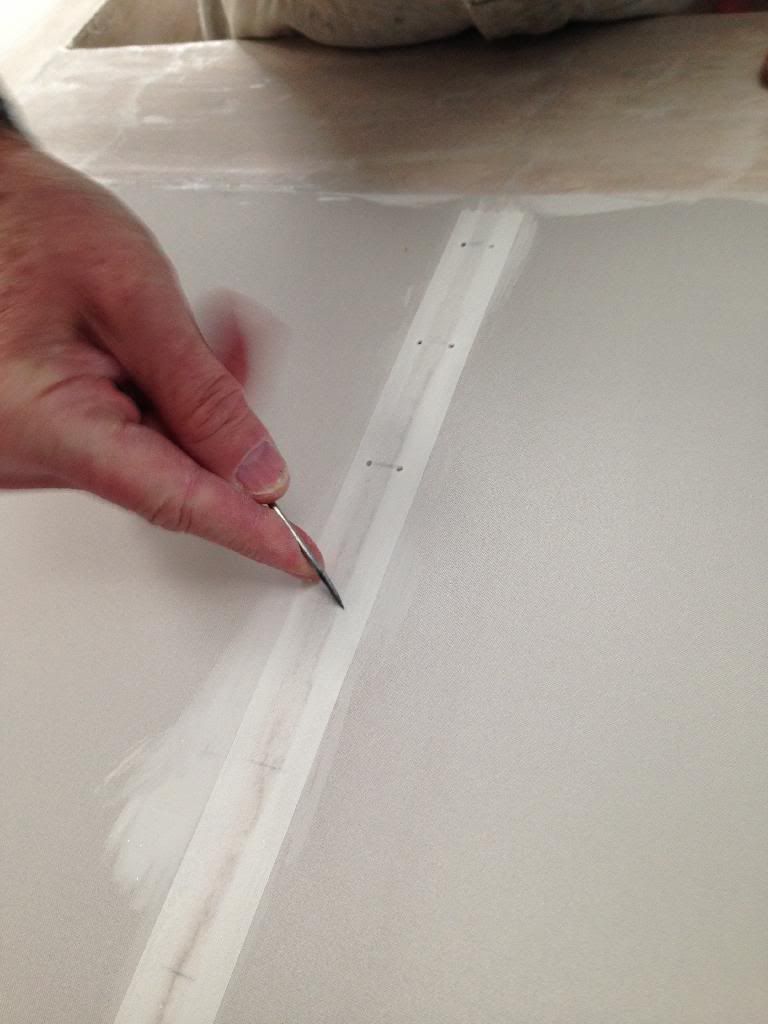
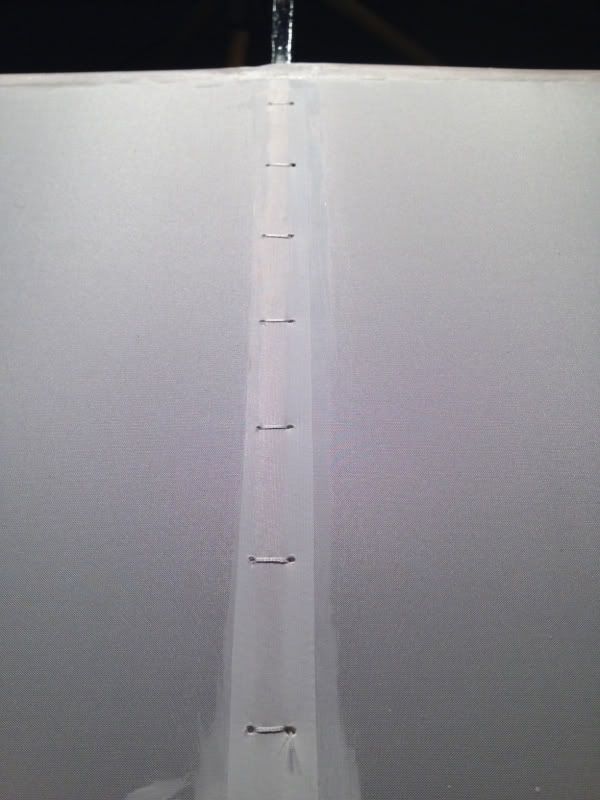
For those who don't know, the purpose of rib stitching is to attach the fabric to the ribs that run throughout the wing. This stops the fabric lifting away from the wing in flight, retaining its aerofoil shape. The faster the aircraft's VNE, the closer together the stitches need to be. The Turb is having two inch spacings on the wing, sufficient for a VNE of 150 kts.
To start with, the spacings are carefully marked out, ensuring that no stitches will fall somewhere where they might foul on part of the internal pulleys/cables etc. After cementing a narrow fabric strip to the wing fabric along the line of the rib (to add strength for the stitching and to stop the stitch chafing on the rib), small holes are made either side of the rib with a stitching needle. These help a lot when doing the stitching. I did wince a a little doing this, as it seemed rather bizarre to be stabbing holes in such a lovely covering...
Marking Out
A Finished Row
Wing Ready for Stitching
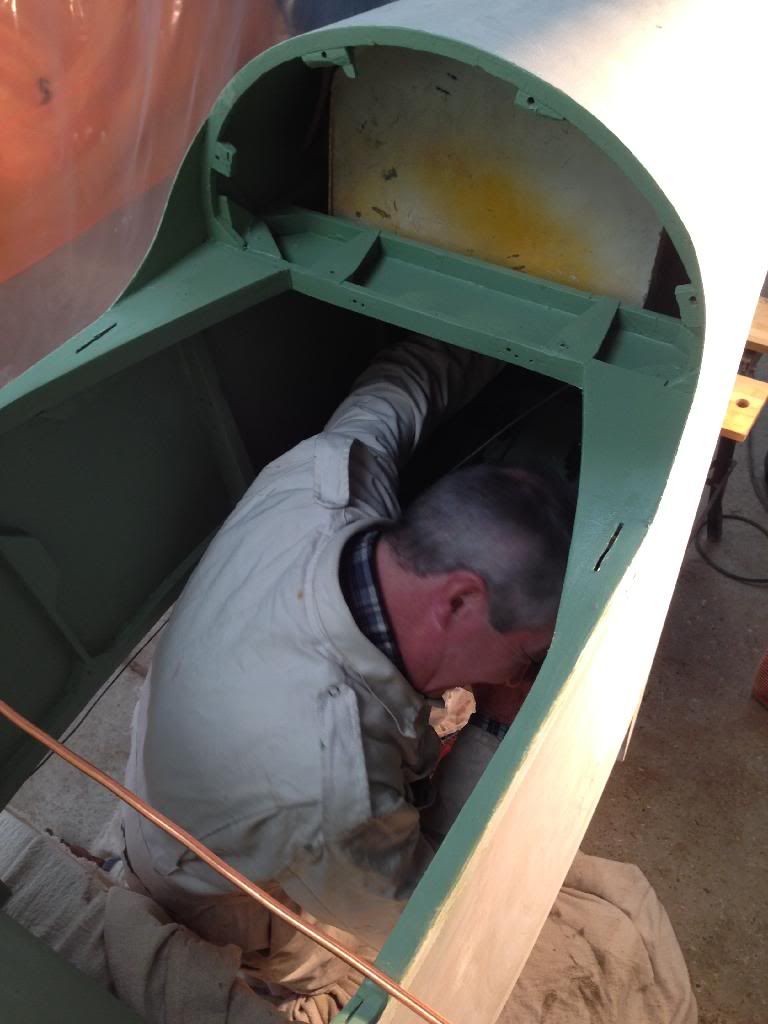
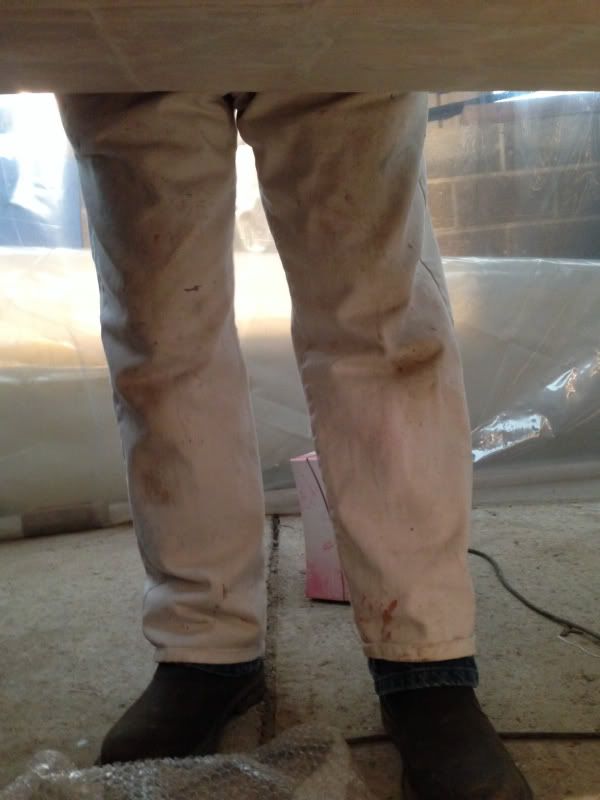
Today we will be starting stitching. When I asked Sam if we might manage to do both sides by tonight, I was met with another of his 'don't be so impatient' looks, so I agreed that one side would be just fine. My job will be lying underneath on a big heap of bubble wrap passing the needle back up through the wing for most of the morning.
31/01/14
We'll, after 174 stitches, a few swear words, enough tea and cake to feed a Scotsman, and some sore fingers, the stitching is done. This leaves the tapes to be cemented over the rows of stitching, and then it's time for painting the wing.
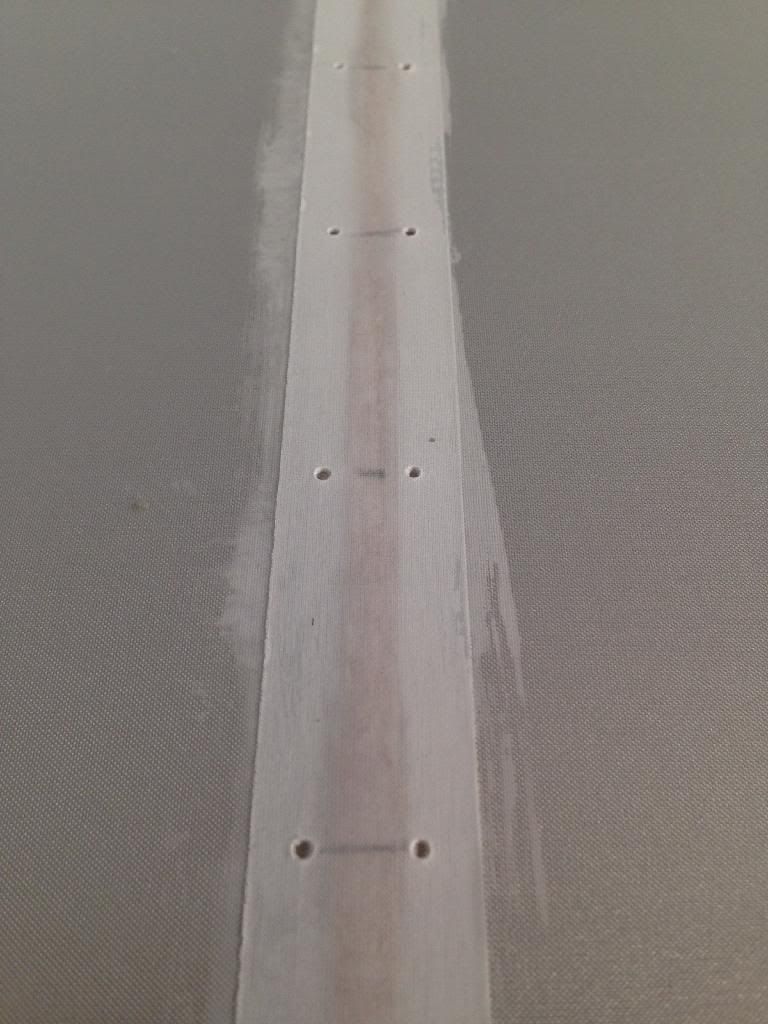
A neat row of completed rib stitches.
We decided that it would be easier if I was below the wing (to verbally guide needle into hole, and then pass it back up the neighbouring holes to enable Sam to do the actual knot from above. So, it was 8 hours lying underneath the inverted wing, on a big heap of bubble wrap, with the following view....
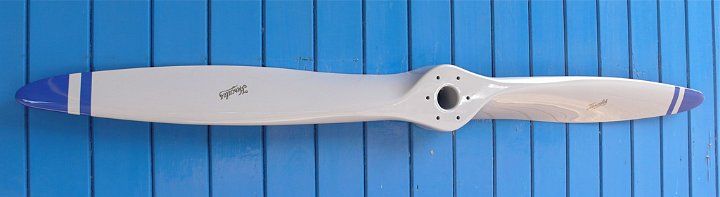
As mentioned, the prop is now on order, and the deposit was paid this week. We have gone for one that'll look like this; a lovely light grey with matching tip colours for the paint scheme. Rupert thinks it'll be 6 weeks before it's ready, which we are hoping will time nicely with when we are putting it all together.
I don't know about everyone else, but I'm getting pretty twitchy about the length of time ago that I last flew. It's a fortnight now, and the strip has had yet another dose of water today, with even heavier rain forecast next week, and some pretty awful winds in between. Still, at least it's giving us plenty of time to focus on this project.
While my painting of the control surfaces continues, Sam has been busy getting the panel sorted. He's pretty much finished, and here's how it looks.
The paint scheme is a system that's used a lot in America, and that we are currently getting approval from the LAA for, for use on the wing's (unsupported fabric) structure. To save the traditional long-winded spray system requiring various coats of stinky and expensive paints, the system involves applying two layers of smooth exterior paint, followed by a coat of external trade standard gloss. All layers can be rollered on, creating a superb finish when a fine grade foam roller is used. The paints have inbuilt UV protection, are fire resistant and are non-toxic. As a system, it has been used on various aircraft (Minimax etc) with success, including some well known British red display jets...
The test panel we have made is a requirement of the LAA as a panel that will be stored outside once completed to allow is to regularly check it's condition.
18/01/14
If someone had told me five years ago that there'd be a day when I chose to stay in a workshop working on an aircraft build instead of go flying, I'd have laughed. Well, the sun is out today and the Cub has stayed in the hangar, so I can paint!! My wife put my headsets out on the breakfast table and was a bit surprised to see them still there at 1100 hrs.
Lots of progress in the past 48 hours. I've focused on the control surfaces first, giving them two base coats and two light gloss coats. I'm pleased that the fabric weave is still visible through the paint, indicating that the coats have been the right thickness. The finish provided by this system is pretty impressive, although it does require one to be a little on the obsessive side to get it right.
Aileron x1, tailplane and elevator.
Fuselage with two base coats and awaiting first light gloss coat. I plan to do that tonight.
Bit more of the fuse
A half finished aileron
Ideally, I'd like to have the painting all wrapped up by the end of next week. Getting the lines in the right place where the two colours meet will take some planning, but I'm pretty sure I've worked out how to do it safely.
21/01/14
Well, today was a boy's trip out to buy a propeller for ARIM.
We knew there was only one real option for something that would maximise performance and I called Rupert Wasey at Hercules Propellers yesterday to check it was ok to call in and see him today. He said to call in whenever, and that he would be there.
What a lovely chap and what a superb business!!
We had a full guided tour of what can only be described as an aviator's heaven. We saw the whole system in detail from the beech raw material 'planks', through the bonding process, then the CNC process, followed by the hand crafting section, and finally followed by the finishing and painting section.
We knew we were going to buy one before we arrived, but by the time we left we were very close to ordering three. One for the Turb, one for my Cub, and one for Sam's Luton. The Turb one is ordered, and the Cub/Luton ones are very soon to be...
Thanks Rupert (in case you ever read this). You gave us more of your time than we expected and it was appreciated.
There's no point in a boy's trip out without a pub lunch (we tried driving to Kemble's Aviator but couldn't find the right way in once through the main gate to the airfield! ) so we went to an old haunt of mine when I was at Ag' college near there.
When I arrived home I was pleased to see that the registration lettering had arrived. Mirage Signs (Warminster) did them and they were incredibly helpful throughout the whole ordering process, and I can highly recommend them. Ask for Pete; he's a top chap.
Then, an hour's painting of flying control surfaces, and it's time for meatball arrabbiatta with linguine.
I can feel another project coming on.....
21/01/14
Had a look at the reg letters that arrived a couple of days ago. They are spot on, and it feels like she finally has an identity.
I didn't realise quite how much time it would take choosing a suitable font. The initial ones we were offered were either very modern looking, or just too 'harsh'. In the end we trawled through loads of other Turb pics and found a font we liked. It turned out that it was an option and is a post-war RAF font. We like it anyway. Does anyone know its official name?
When discussing the reg font with Mrs M a week or two ago, she (with her reasonable GA knowledge) asked if we had considered re-registering the Turb in Germany. I asked why on earth we would want to do that. Her response, which was well thought out, and still makes me laugh now, was...
"Well you could register it D-UREX, because it's a pretty good contraceptive with you out in the workshop all night".
24/01/14
28/01/14
With the fuselage set aside for a week to let the first colour of paint harden (I'm still worrying that removing the masking tape after I apply the second colour will take a neat line of the first colour off...), we decided to make the most of the time and get the wing ribs stitched and taped.
Putting the one-piece wing back in the cowshed reminded me how big it is compared to the fuselage.
For those who don't know, the purpose of rib stitching is to attach the fabric to the ribs that run throughout the wing. This stops the fabric lifting away from the wing in flight, retaining its aerofoil shape. The faster the aircraft's VNE, the closer together the stitches need to be. The Turb is having two inch spacings on the wing, sufficient for a VNE of 150 kts.
To start with, the spacings are carefully marked out, ensuring that no stitches will fall somewhere where they might foul on part of the internal pulleys/cables etc. After cementing a narrow fabric strip to the wing fabric along the line of the rib (to add strength for the stitching and to stop the stitch chafing on the rib), small holes are made either side of the rib with a stitching needle. These help a lot when doing the stitching. I did wince a a little doing this, as it seemed rather bizarre to be stabbing holes in such a lovely covering...
Marking Out
A Finished Row
Wing Ready for Stitching
Today we will be starting stitching. When I asked Sam if we might manage to do both sides by tonight, I was met with another of his 'don't be so impatient' looks, so I agreed that one side would be just fine. My job will be lying underneath on a big heap of bubble wrap passing the needle back up through the wing for most of the morning.
31/01/14
We'll, after 174 stitches, a few swear words, enough tea and cake to feed a Scotsman, and some sore fingers, the stitching is done. This leaves the tapes to be cemented over the rows of stitching, and then it's time for painting the wing.
A neat row of completed rib stitches.
We decided that it would be easier if I was below the wing (to verbally guide needle into hole, and then pass it back up the neighbouring holes to enable Sam to do the actual knot from above. So, it was 8 hours lying underneath the inverted wing, on a big heap of bubble wrap, with the following view....
As mentioned, the prop is now on order, and the deposit was paid this week. We have gone for one that'll look like this; a lovely light grey with matching tip colours for the paint scheme. Rupert thinks it'll be 6 weeks before it's ready, which we are hoping will time nicely with when we are putting it all together.
I don't know about everyone else, but I'm getting pretty twitchy about the length of time ago that I last flew. It's a fortnight now, and the strip has had yet another dose of water today, with even heavier rain forecast next week, and some pretty awful winds in between. Still, at least it's giving us plenty of time to focus on this project.
Thread Starter
Join Date: Jan 2002
Location: Earth
Posts: 1,189
Likes: 0
Received 0 Likes
on
0 Posts
03/02/14
I'm in a bit of trouble..........
On Friday, Sam asked me to make sure that the Cowshed was nice and warm this morning ready for us to cement the tapes over the freshly stitched wing ribs. I diligently went over to the workshop at 0800 hours and set up the heater from the farm office in the Cowshed and left it running on FULL to allow it to heat up. The idea is that when the heat is up and the humidity is lower, there is less chance that the cement will bloom, and go all white as it dries.
I popped back to get something from the house an hour after we got started work (1130 ish) and couldn't find Mrs M anywhere in the house. So, I called in to see if she was in the office, only to find her doing the VAT return on her computer with two Puffa jackets on, gloves, and she was sporting a rather blue hue to her face. I think that'll be dinner somewhere nice tonight.....
Anyway, the tapes are on (both sides) and tomorrow's job are the tapes on the trailing edge, wing tip, and leading edges.
Then, after some checking over the fabric for any raised areas of cement, it'll be time to don the roller again.
Applying cement to give the cement that is brushed onto the tapes something to bite onto:
Getting ready to attach the tape, making sure that it runs perfectly parrallel and that it has a nice round (pinked edge) front to it:
All done:
04/02/14
Mrs M had defrosted by about 1900 hours last night, which was good. It was also just in time for her to realise we were going to be taking the heater again for another day.... I blamed Sam, and he went along with it which was good... It's not a problem, and the VAT return can just wait for a few days.
We had some more tapes to apply today, and we did the trailing edge, the wing tips and some other ones in the aileron recesses etc. These are to make sure that the rib tapes etc don't peel in the future, and basically tidy it all up nicely.
A 3 hour session reduced to 60 seconds is shown below...
Tomorrow, we have a small admin' job to do as part of the paint MOD process, so the rest of the tapes (leading edge) will have to wait until Thursday.
By 1430 hrs today we were both getting hungry ad grumpy so we decided to call it a day. I'm limiting myself to 1600 calories a day for the next 8 weeks to get down to Turb-weight of around 12 stone. I see it as a good way for me to retain a racing-snake-like physique (!!) through my 40's and beyond! Well, I'm burglered if I'm going to spend all this time on the aircraft and only be able to look at it for the next 20 years!!
After some lunch and sorting some emails I decided to conquer a fear of mine. I've been worrying that the Frog Tape (posh masking tape) will remove a neat strip of cream paint when I remove it after adding the blue colour trim. So, I decided it was time to go for it. This time, (I don't really know why) I decided that the kitchen table would be a good place to do it. Warm, clean, light, and near the kettle*.
So, I set about masking the line that I wanted and getting the Royal Regatta (blue paint) ready. It does go on very well compared to the cream that requires more coats. I'm also really pleased with the two colours and how they go together. So, within 20 minutes I had a stabiliser with a nice blue leading edge, and a sudden (well, that's what I told her) realisation came over me that it couldn't be moved until it was dry....
An hour later a Domino's scooter came down the drive and the kids were chuffed that they could eat their Meat Feast pizzas I had ordered them in their TV room without being moaned at. Mrs M is just eating some pasta I made for her on her lap in the drawing room.... She isn't aware of how long the kitchen is out of bounds for, but I reckon it'll be a coupl'a days, at least...
Stabliser nearing completion
* Not for any clever technical reasons, just for some occasional Assam Pekoe.
05/02/14
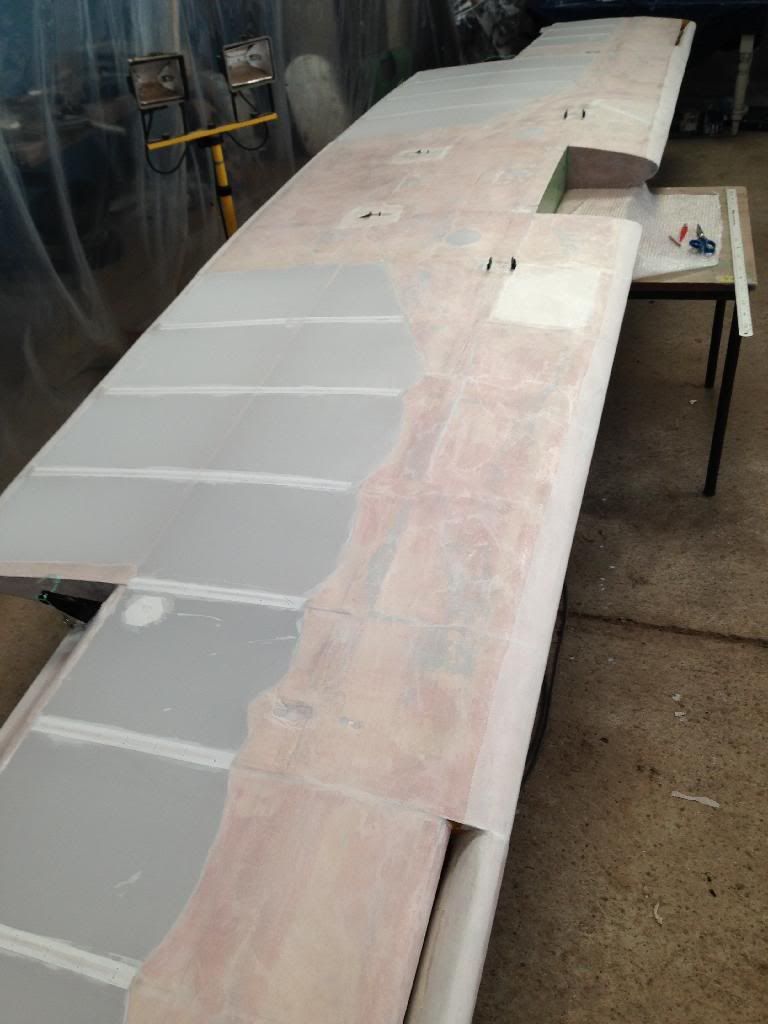
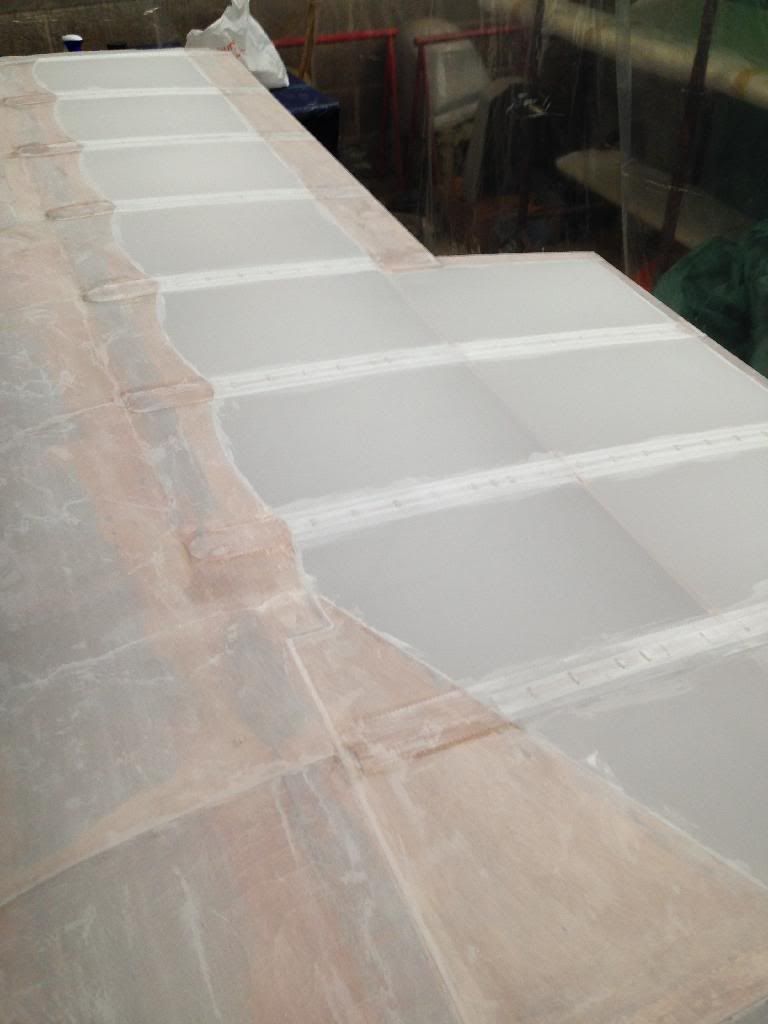
We spent a fair bit of time today going over both sides of the wing making sure any imperfections in the surface (any small lumps of fabric glue, hairs, dust etc) were all removed. A couple of final tapes were also applied in the wingtip slatted sections to ensure a tidy finish in this area.
It was then a case of going over the wing with a fine mist spray (water) and clean cotton cloth to make sure there was nothing that could get below the paint.
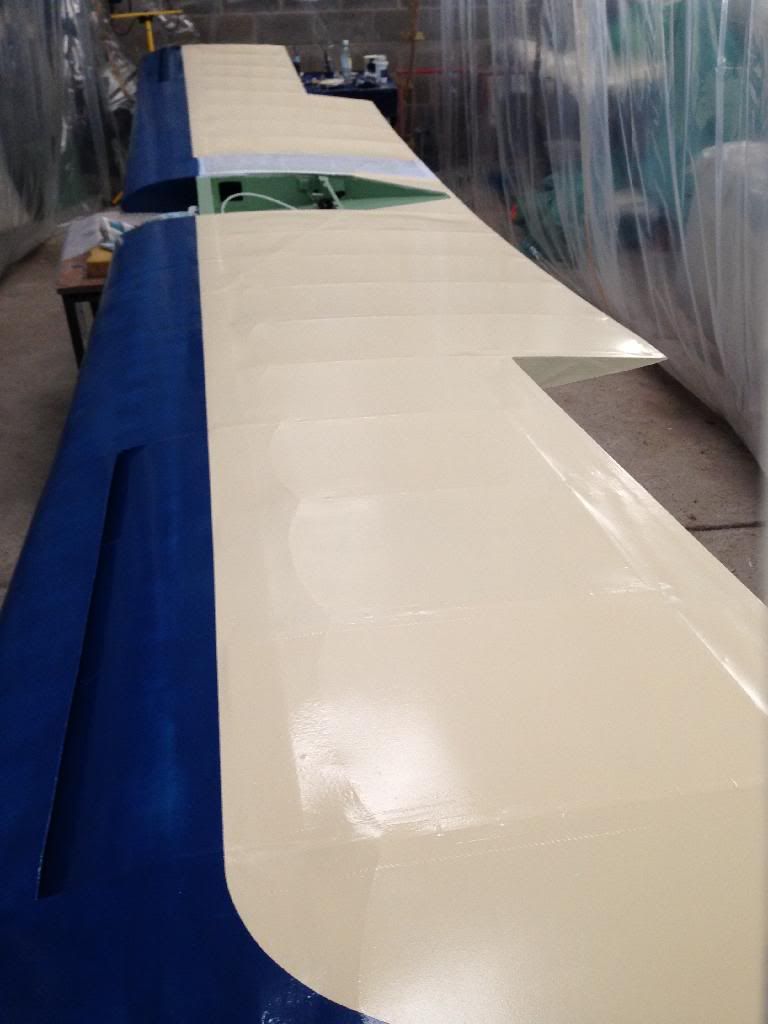
Wing completely finished and ready for paint
First coat of paint on top side. Second one later tonight.
08/02/14
Second undercoat applied late last night to underside of wing.
First top coat this morning. Leading edge will be in the Royal Blue (after careful masking), hence I've left it.
10/02/14
Second and last coat of blue on underside of wing tomorrow. Then, we'll flip her over and do her top. I've got the masking process sussed now, after learning from a minor dropping of a bolleauk when doing the rudder.
The farm might flood, but the Turb will go on regardless. If needs be, I can put the Turb in the house and the house furniture in the farm buildings.
19/02/14
I decided the cream coat was dry enough to apply the blue leading edge to the top side of the wing this morning.
Masking (Frog tape, as advised) was used to create a decent paint seal and to stop any seepage into the cream. I took ages over getting the line right, even though as someone correctly pointed out, if it's a few mm out either side it is impossible to tell when each end will always be 25 feet apart!!
As you can see, I got bored waiting for the cream to be dry enough to apply the masking tape safely, so I had already casually applied thin coat of the blue (well within the planned final line) and timed it so the next coat would go on at the right stage of drying (just past tack dry).
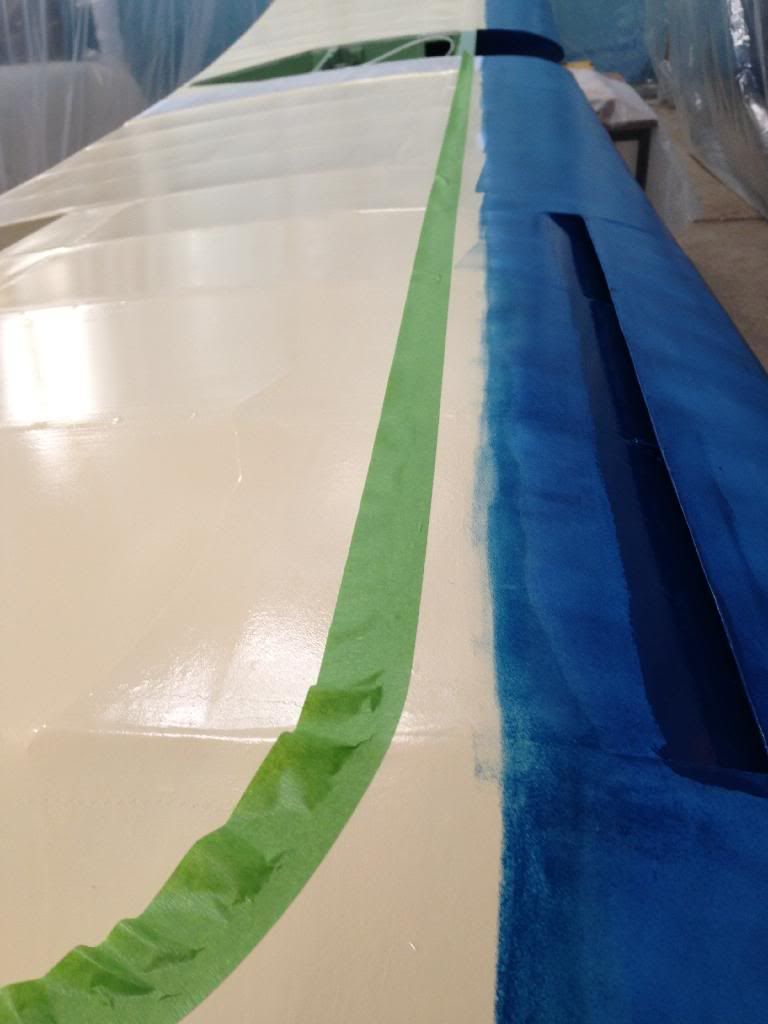
I then find it best to do a single decent coat along the mask line before getting the tape off mainly because I find it best to remove the tape reasonably quickly (within 15 mins) after applying to minimise the risk of any paint uplift when peeling off. So, after tape removal I then fill in the gaps. This is with 1.5 coats with a final one to go on tomorrow.
I ordered the wing walk paint this morning from LAS, and that'll be going on by the end of the week too. Then it's time for application of the registration letters (after some clever working out how to avoid inspection hole panels....) and then wrapping up ready for assembly.
All that'll be left to do then in terms of painting is the blue on the fuselage. That'll be next week, and when that's being done Sam will be able to start fitting out the fuel tank, final panel installation and various other fuselage bits.
I'm in a bit of trouble..........
On Friday, Sam asked me to make sure that the Cowshed was nice and warm this morning ready for us to cement the tapes over the freshly stitched wing ribs. I diligently went over to the workshop at 0800 hours and set up the heater from the farm office in the Cowshed and left it running on FULL to allow it to heat up. The idea is that when the heat is up and the humidity is lower, there is less chance that the cement will bloom, and go all white as it dries.
I popped back to get something from the house an hour after we got started work (1130 ish) and couldn't find Mrs M anywhere in the house. So, I called in to see if she was in the office, only to find her doing the VAT return on her computer with two Puffa jackets on, gloves, and she was sporting a rather blue hue to her face. I think that'll be dinner somewhere nice tonight.....
Anyway, the tapes are on (both sides) and tomorrow's job are the tapes on the trailing edge, wing tip, and leading edges.
Then, after some checking over the fabric for any raised areas of cement, it'll be time to don the roller again.
Applying cement to give the cement that is brushed onto the tapes something to bite onto:
Getting ready to attach the tape, making sure that it runs perfectly parrallel and that it has a nice round (pinked edge) front to it:
All done:
04/02/14
Mrs M had defrosted by about 1900 hours last night, which was good. It was also just in time for her to realise we were going to be taking the heater again for another day.... I blamed Sam, and he went along with it which was good... It's not a problem, and the VAT return can just wait for a few days.
We had some more tapes to apply today, and we did the trailing edge, the wing tips and some other ones in the aileron recesses etc. These are to make sure that the rib tapes etc don't peel in the future, and basically tidy it all up nicely.
A 3 hour session reduced to 60 seconds is shown below...
Tomorrow, we have a small admin' job to do as part of the paint MOD process, so the rest of the tapes (leading edge) will have to wait until Thursday.
By 1430 hrs today we were both getting hungry ad grumpy so we decided to call it a day. I'm limiting myself to 1600 calories a day for the next 8 weeks to get down to Turb-weight of around 12 stone. I see it as a good way for me to retain a racing-snake-like physique (!!) through my 40's and beyond! Well, I'm burglered if I'm going to spend all this time on the aircraft and only be able to look at it for the next 20 years!!
After some lunch and sorting some emails I decided to conquer a fear of mine. I've been worrying that the Frog Tape (posh masking tape) will remove a neat strip of cream paint when I remove it after adding the blue colour trim. So, I decided it was time to go for it. This time, (I don't really know why) I decided that the kitchen table would be a good place to do it. Warm, clean, light, and near the kettle*.
So, I set about masking the line that I wanted and getting the Royal Regatta (blue paint) ready. It does go on very well compared to the cream that requires more coats. I'm also really pleased with the two colours and how they go together. So, within 20 minutes I had a stabiliser with a nice blue leading edge, and a sudden (well, that's what I told her) realisation came over me that it couldn't be moved until it was dry....
An hour later a Domino's scooter came down the drive and the kids were chuffed that they could eat their Meat Feast pizzas I had ordered them in their TV room without being moaned at. Mrs M is just eating some pasta I made for her on her lap in the drawing room.... She isn't aware of how long the kitchen is out of bounds for, but I reckon it'll be a coupl'a days, at least...
Stabliser nearing completion
* Not for any clever technical reasons, just for some occasional Assam Pekoe.
05/02/14
We spent a fair bit of time today going over both sides of the wing making sure any imperfections in the surface (any small lumps of fabric glue, hairs, dust etc) were all removed. A couple of final tapes were also applied in the wingtip slatted sections to ensure a tidy finish in this area.
It was then a case of going over the wing with a fine mist spray (water) and clean cotton cloth to make sure there was nothing that could get below the paint.
Wing completely finished and ready for paint
First coat of paint on top side. Second one later tonight.
08/02/14
Second undercoat applied late last night to underside of wing.
First top coat this morning. Leading edge will be in the Royal Blue (after careful masking), hence I've left it.
10/02/14
Second and last coat of blue on underside of wing tomorrow. Then, we'll flip her over and do her top. I've got the masking process sussed now, after learning from a minor dropping of a bolleauk when doing the rudder.
The farm might flood, but the Turb will go on regardless. If needs be, I can put the Turb in the house and the house furniture in the farm buildings.
19/02/14
I decided the cream coat was dry enough to apply the blue leading edge to the top side of the wing this morning.
Masking (Frog tape, as advised) was used to create a decent paint seal and to stop any seepage into the cream. I took ages over getting the line right, even though as someone correctly pointed out, if it's a few mm out either side it is impossible to tell when each end will always be 25 feet apart!!
As you can see, I got bored waiting for the cream to be dry enough to apply the masking tape safely, so I had already casually applied thin coat of the blue (well within the planned final line) and timed it so the next coat would go on at the right stage of drying (just past tack dry).
I then find it best to do a single decent coat along the mask line before getting the tape off mainly because I find it best to remove the tape reasonably quickly (within 15 mins) after applying to minimise the risk of any paint uplift when peeling off. So, after tape removal I then fill in the gaps. This is with 1.5 coats with a final one to go on tomorrow.
I ordered the wing walk paint this morning from LAS, and that'll be going on by the end of the week too. Then it's time for application of the registration letters (after some clever working out how to avoid inspection hole panels....) and then wrapping up ready for assembly.
All that'll be left to do then in terms of painting is the blue on the fuselage. That'll be next week, and when that's being done Sam will be able to start fitting out the fuel tank, final panel installation and various other fuselage bits.
Thread Starter
Join Date: Jan 2002
Location: Earth
Posts: 1,189
Likes: 0
Received 0 Likes
on
0 Posts
I applied the wing walk compound paint last night. That's some weird stuff that is!
This afternoon it's under-wing registration application time.....
More later.....
This afternoon it's under-wing registration application time.....
More later.....
Thread Starter
Join Date: Jan 2002
Location: Earth
Posts: 1,189
Likes: 0
Received 0 Likes
on
0 Posts
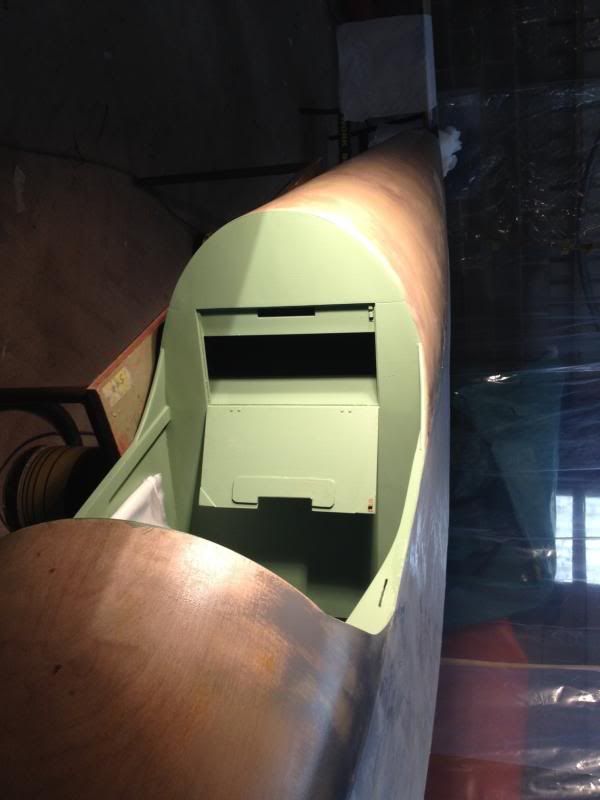
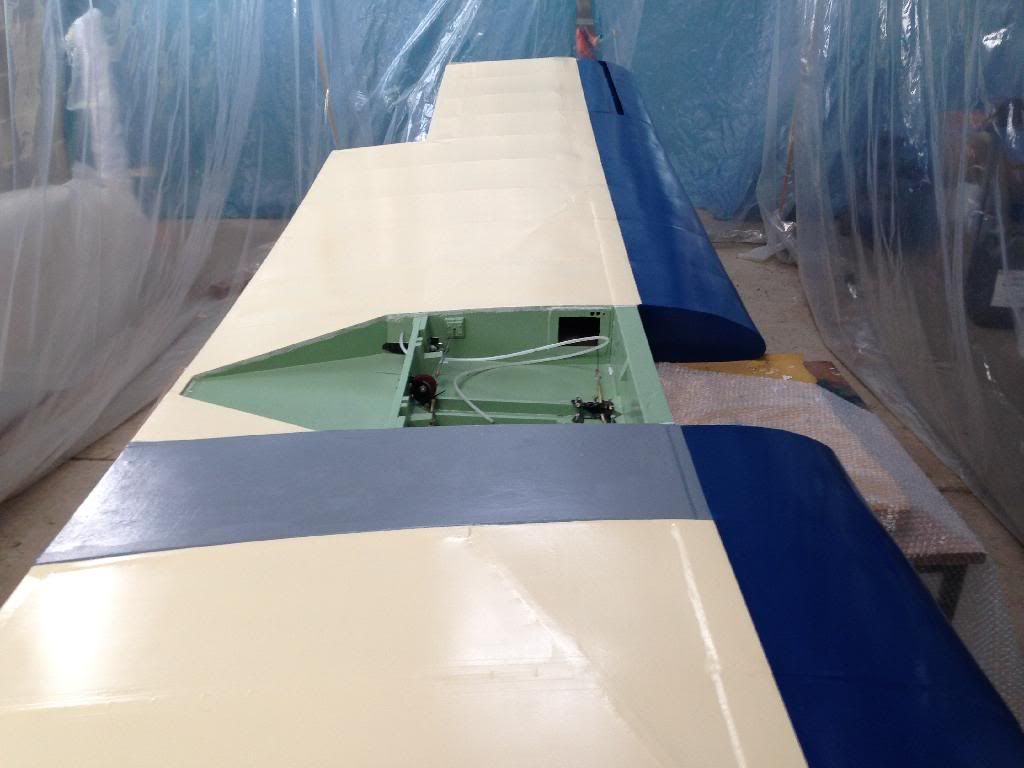
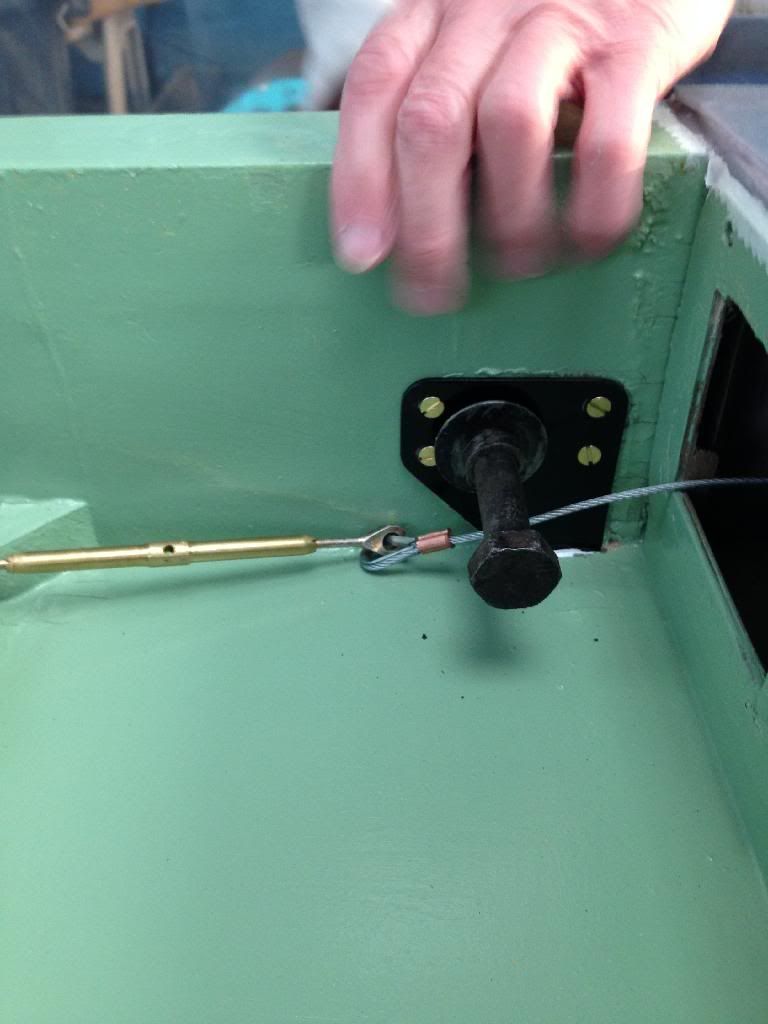
We've just finished tidying up the green painting for the control bay that lives under the seat. Sam also attached the supporting brackets for the wing attachment bolts to make sure that they didn't foul on the brackets.
Then, it was time for the underside wing registration to be applied. It was a bit nerve wracking, but in the end it went on quite easily:
Finished! Some clever painting will be done on the access panel where the 'R' is.
Next week, the fuselage will have the final painting finished and start to be kitted out.
I sure enjoyed reading that. Nice workmanship and attention to detail.
The period art deco inspired exterior colors are right. The traditional UK cockpit green is also good, and a whole lot more attractive than the Douglas or Russian turquoisey versions of same!
The period art deco inspired exterior colors are right. The traditional UK cockpit green is also good, and a whole lot more attractive than the Douglas or Russian turquoisey versions of same!
Join Date: May 2013
Location: have I forgotten or am I lost?
Age: 71
Posts: 1,126
Likes: 0
Received 0 Likes
on
0 Posts
I built most of a turbulent once upon a time and I have flown one. delightful little aeroplane.
with my fuselage almost complete I sat in it on the bench and to my eternal frustration found I couldn't fit in the cockpit
it took ages to find out what size roger druine was.
closest I came was a photo of him and henri mignet together. they were about the same size.
in henri's plans for the HM293 he mentions a flying weight for the pilot of 65kg.
this accords with a pilot of about 5ft tall and slim build.
I was well underway with a second fuselage that had the seat 2 inces back when I was told that the turbulent I had flown already had this mod.
I eventually gave the entire project to a short guy to complete.
overall an interesting but very frustrating little aeroplane.
Join Date: Nov 2013
Location: Inacave
Posts: 71
Likes: 0
Received 0 Likes
on
0 Posts
Hey Moderators!
This lovely story deserves a 'sticky' as it will be highly interesting to all for ages to come. My highest kudos for the approach being taken to create another flying jewel and for sharing it with us here here 
Join Date: Jan 2008
Location: lancs.UK
Age: 77
Posts: 1,191
Likes: 0
Received 0 Likes
on
0 Posts
Mono, glad to have spottedthe update here.....a beautiful bit of restoration and Conservation,with no need for white gloves 
Funny how the "beat the Mods" game is shunting traffic between the two sites.
You should be done by the time the monsoon season is over....but will you be "down to weight" in time?
Perhaps Henri was dyslexic ...his name should have been spelt "midget"
Pen loaded with opprobrium and vitriol for the troublemaker over the way....Dummy or Cigar?
Join Date: Jan 1997
Location: UK
Posts: 7,737
Likes: 0
Received 0 Likes
on
0 Posts
The Snipe makes me a bit helpless Bral. Bedtime reading is often the Albatross profile on it, text books and I have the Jim Kiger 1:5 th scale complete plan set for it.
I'll discuss stickiness with Saab as the stats show such threads become 'invisible' to readers after a relatively short period. I might suggest a compromise of 7 days sticky each time Monocock offers up a photo update.
Whether it's mods, building, restoration, recovering, paint stripping or repainting I'd love to see threads on them. I'm also intrigued with the paint process being used on the Turbi above. The crosslinked Polyfiber roll on or perhaps something different given the involvement and testing requirements of the LAA?
Rob
Thread Starter
Join Date: Jan 2002
Location: Earth
Posts: 1,189
Likes: 0
Received 0 Likes
on
0 Posts
I'm glad you like it Rob.
The 'sticky' is a kind offer, but on the basis that it jumps to the top with each update anyway, please don't feel you have to go out of your way. Cheers all the same.
I will normally update it once a week (at least) unless nothing of interest has happened.
The 'sticky' is a kind offer, but on the basis that it jumps to the top with each update anyway, please don't feel you have to go out of your way. Cheers all the same.
I will normally update it once a week (at least) unless nothing of interest has happened.
Thread Starter
Join Date: Jan 2002
Location: Earth
Posts: 1,189
Likes: 0
Received 0 Likes
on
0 Posts
bral,
The rib stitching is specified in the designer's plans, hence we did them. We have gone with 2 inch spacings as that is what is required for a speed range of up to 150 kts.
I took a picture today of the inside of the wing which looks like the interior of some kind of industrial building...
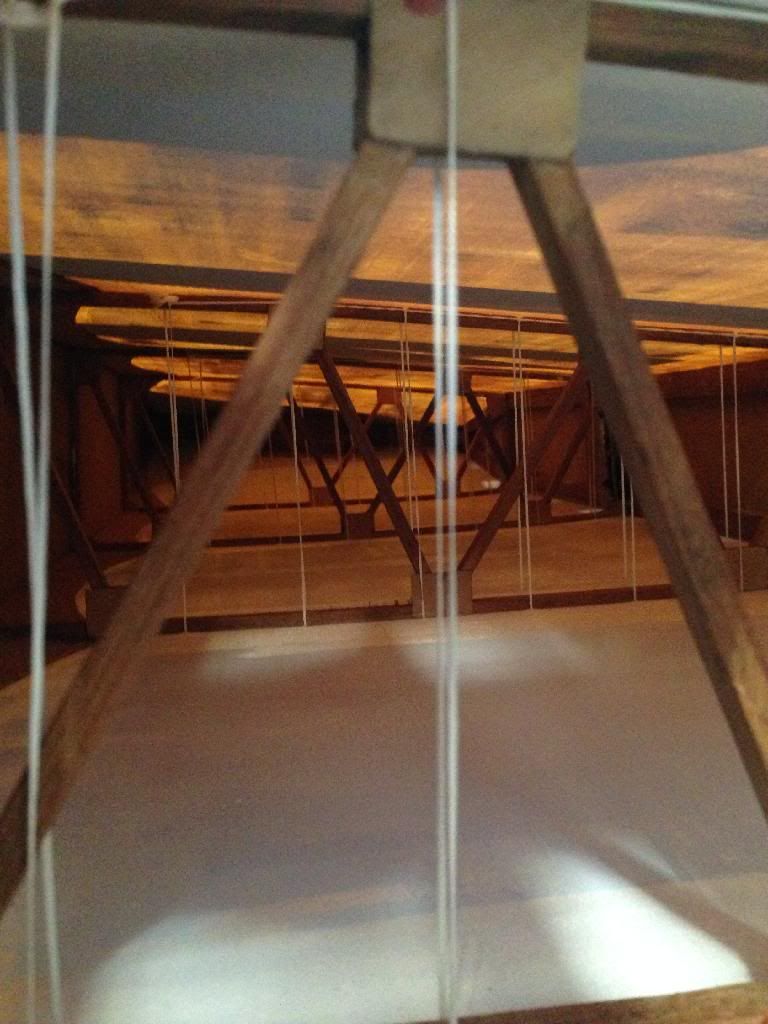
We then burned out the drain holes in each rib bay, located on the lower end of each bay to allow any moisture out, and for the wing to effectively "breathe". After all the hours of work spent covering, stitching, taping and painting, it almost seemed criminal to burn little holes in it!
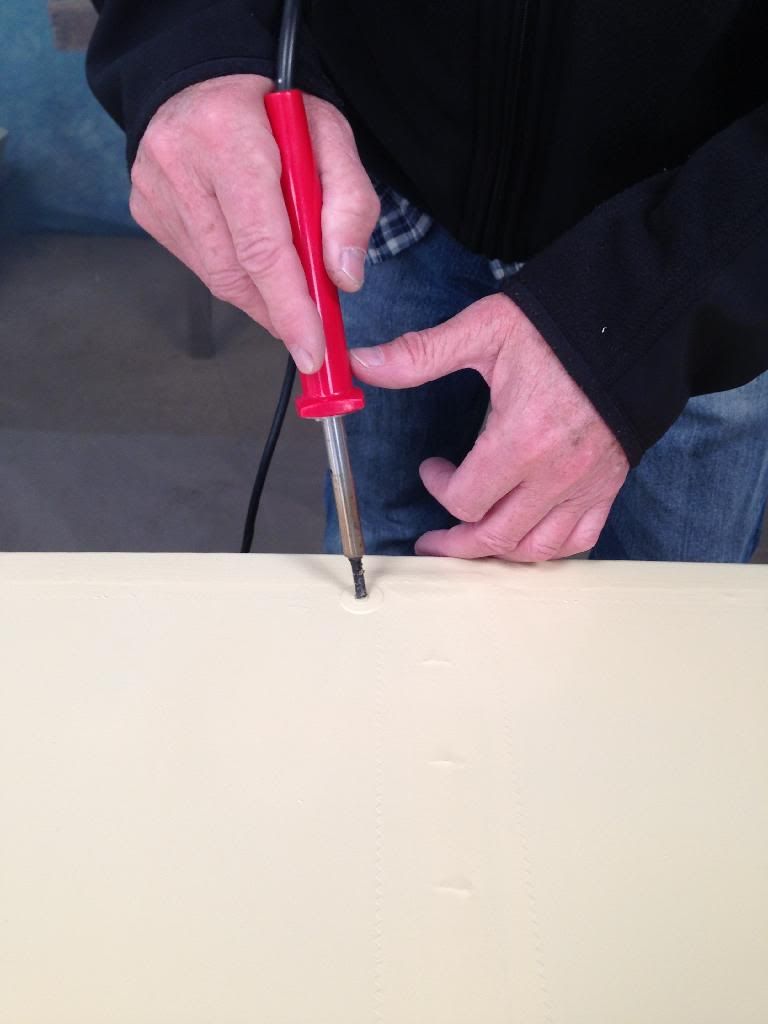
The wing is now completely finished and it was time to take it out of the workshop to allow space for the fuselage again. I couldn't resist a picture of it just before it was put away; it did look lovely, even if I say so myself...
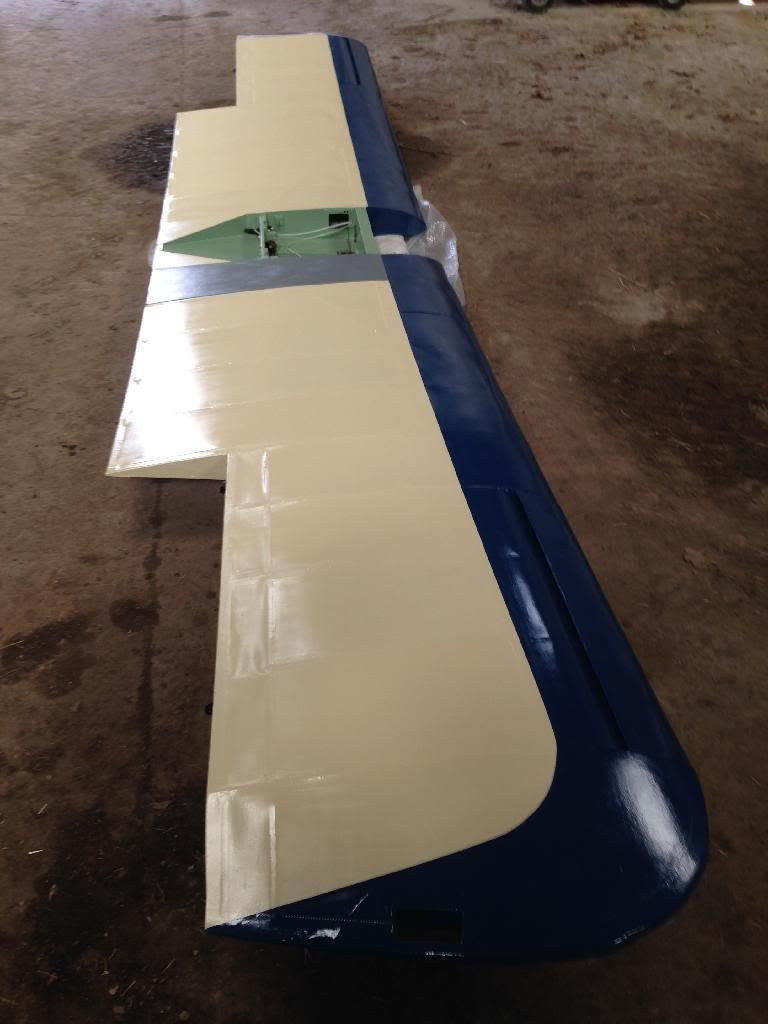
With the fuselage now on the work table, I am hoping to be able to post a picture of it by early next week with the painting fully completed and ready for assembly to start....
The rib stitching is specified in the designer's plans, hence we did them. We have gone with 2 inch spacings as that is what is required for a speed range of up to 150 kts.
I took a picture today of the inside of the wing which looks like the interior of some kind of industrial building...
We then burned out the drain holes in each rib bay, located on the lower end of each bay to allow any moisture out, and for the wing to effectively "breathe". After all the hours of work spent covering, stitching, taping and painting, it almost seemed criminal to burn little holes in it!
The wing is now completely finished and it was time to take it out of the workshop to allow space for the fuselage again. I couldn't resist a picture of it just before it was put away; it did look lovely, even if I say so myself...
With the fuselage now on the work table, I am hoping to be able to post a picture of it by early next week with the painting fully completed and ready for assembly to start....
Monocock,
Wonderful workmanship, wonderful pictures and descriptions. Thank you for sharing the restoration with us. Your comments about dieting confirmed what I had suspected. I'm long past the age where my weight would have allowed me to fly one.
I love that picture of the wing interior - to me it looks like a model for a futuristic film-set.
I've always liked the Turbulent ever since I first saw one at a Tiger Club display at Ramsgate airport in the late 50s. A red one, I think. My dad was highly amused by the pilot doffing his bowler hat to the crowd as he made a 50' fly by.
I gather from cockney steve's comments that this is a continuation of a thread on "the other site". Is that thread still there or has it been deleted?
Rob,
You must have made a slip of the pen there. I'm sure you're aware that Turbi is not the diminutive for a Turbulent, but is the name for a larger, two-place derivative.
Thread Starter
Join Date: Jan 2002
Location: Earth
Posts: 1,189
Likes: 0
Received 0 Likes
on
0 Posts
I gather from cockney steve's comments that this is a continuation of a thread on "the other site". Is that thread still there or has it been deleted?
It's as much a place for keeping a record of the whole process for myself - and if it can be of interest to others them so much the better.