


Canon IXUS 135 camera

Thread Starter
Canon IXUS 135 camera
Anyone know how to
a) change the image resolution
b) remove the date stamp from photos?
Absolutely nothing about either in the manual that came with the camera and doesn't seem to be any options in the menu either....
Cheers!
a) change the image resolution
b) remove the date stamp from photos?
Absolutely nothing about either in the manual that came with the camera and doesn't seem to be any options in the menu either....
Cheers!

Thread Starter
Thanks! Yes I read through that but the manual is incorrect.
It jumps past the "L" to set the resolution, you physically can't select it. And there is no date stamp option on the camera menu despite what the manual says. The only date stamp option anywhere is to set it up for the correct date in the settings menu, not to add or remove it from images.
I was hoping someone might have personal experience of this? It's a great little camera but the date stamp is ruining all the pictures. I had the same problem with my last IXUS, great pictures but a nightmare to try and adjust any settings.
Last edited by Clare Prop; 16th Feb 2014 at 06:06.
Whilst I don't have the Ixus 135, I have had, and continue to have quite a bit of Canon photographic machinery. Infuriating as it possibly is, I've always found that if it's mentioned in the manual, you must be able to do it somehow.
I notice that this setting this "feature" comes within the "Smart Auto Mode" section of the manual. You've possible checked on this, but perhaps make sure that it actually is in that mode when you look for this option. If both this and the image resolution options are 'hiding' there must be some secondary option which is preventing this.
I mention this because I've occasionally found my Canon SLRs to deny access to a desired setting. I've discovered that some of these are mode specific. (I've never used the time and date stamp so I've never had to turn it "off").
Persevere - it must be possible - it's just that some other prior setting or mode is apparently concealing access to those particular screens.
And I agree that sometimes the menu system is not particularly intuitive - not for me anyway.")
FOR
I notice that this setting this "feature" comes within the "Smart Auto Mode" section of the manual. You've possible checked on this, but perhaps make sure that it actually is in that mode when you look for this option. If both this and the image resolution options are 'hiding' there must be some secondary option which is preventing this.
I mention this because I've occasionally found my Canon SLRs to deny access to a desired setting. I've discovered that some of these are mode specific. (I've never used the time and date stamp so I've never had to turn it "off").
Persevere - it must be possible - it's just that some other prior setting or mode is apparently concealing access to those particular screens.
And I agree that sometimes the menu system is not particularly intuitive - not for me anyway.
FOR
Join Date: Aug 2008
Location: Spain
Age: 82
Posts: 490
Likes: 0
Received 0 Likes
on
0 Posts
I do have an IXUS but not the 135. I've never had a problem with it and I thought I'd take a look and see if I could shed any light upon your difficulty. I found the manual here: http://gdlp01.c-wss.com/gds/3/030001...erGuide_EN.pdf
As far as the date stamp is concerned, according to the manual, you should have this:
If you haven't, I suspect a fault with your camera and you'll need to contact Canon.
To change the image resolution, you should have this option:
I hope this helps and I'm not treaching grandmother to suck eggs!
As far as the date stamp is concerned, according to the manual, you should have this:
If you haven't, I suspect a fault with your camera and you'll need to contact Canon.
To change the image resolution, you should have this option:
I hope this helps and I'm not treaching grandmother to suck eggs!
Ixus 120 manual. Don't know if it will work for you........I could not take an "image" so I've put the text here. If you want the full pdf, e-mail me on pprune.
1. Dare stamp below.
2. Image resolution.....below that.
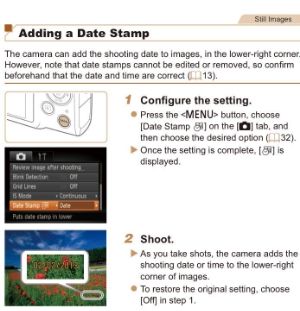
You can insert the shooting date and time in the lower right corner of an
image. Once inserted, however, they cannot be deleted. Be sure to check
beforehand that the date and time are correctly set (p. 19).
Choose [Date Stamp].
● Press the n button.
● Press the qr buttons to choose 4 tab,
and press the op buttons to choose
[Date Stamp].
Accept the setting.
● Press the qr buttons to choose [Date] or
[Date & Time].
● Press the n button again to accept
the setting.
[DATE] will appear on the screen.
Shoot.
The shooting date and time will be
recorded in the image's lower right corner.
● To restore to the original setting, choose
[Off] in Step 2.
� Use the DPOF print settings (p. 128) to print.
� Use the included software to print.
Refer to the Software Guide for details.
� Connect the camera to a printer to print.
Refer to the Personal Printing Guide for details.
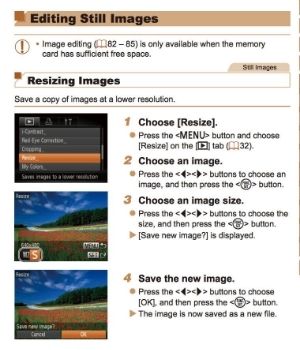
2.You can choose from six recording pixels (image size) settings.
Choose the recording pixels.
● Press the m button and choose , then
press the m button again.
Change the recording pixels.
● Press the op buttons to choose an
option, then press the m button.
The setting you chose will display on the
screen.
You can choose from the following two levels of compression ratio (image
quality): (Fine), (Normal).
Choose the image quality.
● Press the m button and choose , then
press the m button again.
Change the compression ratio.
● Press the op buttons to choose an
option, then press the m button.
The setting you chose will display on the
screen.
1. Dare stamp below.
2. Image resolution.....below that.
You can insert the shooting date and time in the lower right corner of an
image. Once inserted, however, they cannot be deleted. Be sure to check
beforehand that the date and time are correctly set (p. 19).
Choose [Date Stamp].
● Press the n button.
● Press the qr buttons to choose 4 tab,
and press the op buttons to choose
[Date Stamp].
Accept the setting.
● Press the qr buttons to choose [Date] or
[Date & Time].
● Press the n button again to accept
the setting.
[DATE] will appear on the screen.
Shoot.
The shooting date and time will be
recorded in the image's lower right corner.
● To restore to the original setting, choose
[Off] in Step 2.
� Use the DPOF print settings (p. 128) to print.
� Use the included software to print.
Refer to the Software Guide for details.
� Connect the camera to a printer to print.
Refer to the Personal Printing Guide for details.
2.You can choose from six recording pixels (image size) settings.
Choose the recording pixels.
● Press the m button and choose , then
press the m button again.
Change the recording pixels.
● Press the op buttons to choose an
option, then press the m button.
The setting you chose will display on the
screen.
You can choose from the following two levels of compression ratio (image
quality): (Fine), (Normal).
Choose the image quality.
● Press the m button and choose , then
press the m button again.
Change the compression ratio.
● Press the op buttons to choose an
option, then press the m button.
The setting you chose will display on the
screen.
